Three link MLO Wi-Fi 7 with the Intel BE200 and HPE Aruba Networking AP-735
Today, I was able to get a three link MLD setup with an Intel BE200 connected to an HPE Aruba Networking AP-735. I used a ThinkPad T450s as the laptop which required some hardware modifications which are mentioned below in this post.
That’s a link on 2.4 GHz, 5 GHz, and 6 GHz in the same Multi-Link Device (MLD) which is a feature of Multi-Link Operation (MLO) introduced in Wi-Fi 7. MLO is the main feature in the IEEE 802.11be specification and Wi-Fi 7 certification program.
Here is a screenshot showing the clients perspective:
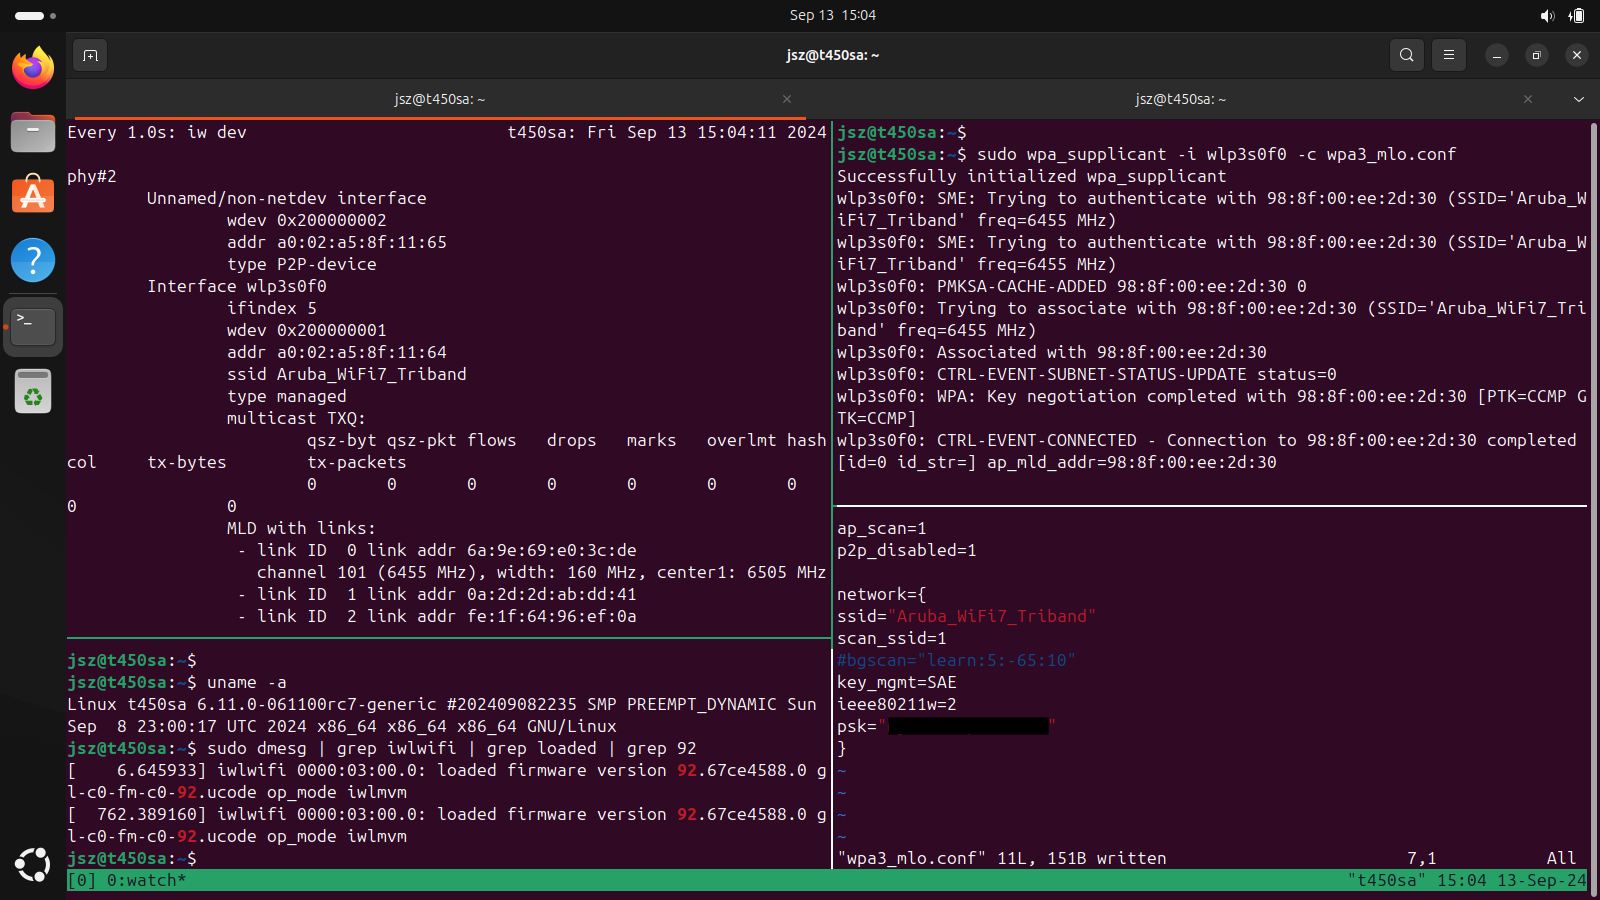
Commands used here:
- tmux to split panes
iw devwill show you if there is an MLD.sudo wpa_supplicant -i wlp3s0f0 -c wpa3_mlo.confto run the config in the bottom right pane.
Minimal wpa_supplicant config for WPA3-Personal (wpa3-sae):
ap_scan=1
p2p_disabled=1

network={
    ssid="<ssid>
    scan_ssid=1
    key_mgmt=SAE
    ieee80211w=2
    psk="<passphrase>"
}
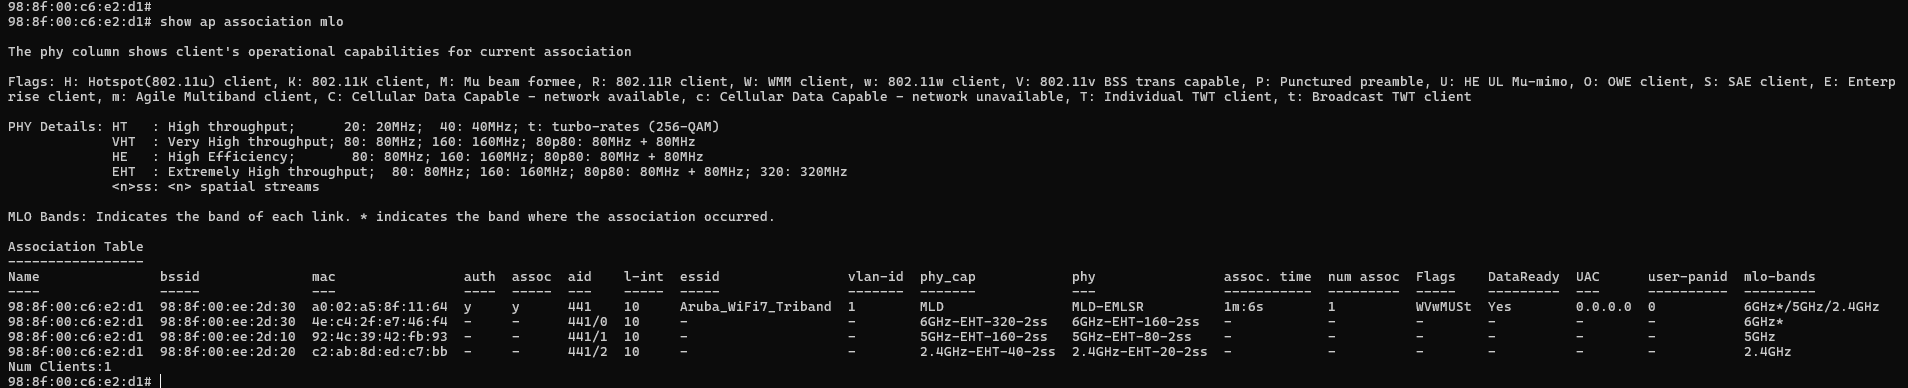
Here is the AP perspective using show ap association mlo:
Let’s talk specifics. How many spatial streams (SS) or radio chains does the Intel BE200 have? The Intel BE200 is a 2 SS client and has two Rx/Tx chains. Most modern clients are 2 SS. There are certainly some products that have more, but the most common device these days are 2 SS for a number of reasons worth their own blog post.
When operating as a single-radio multi-link device, Wi-Fi 7 clients can listen for control frames and contend independently on different links by splitting Rx chains. This means the BE200 can listen simultaneously on different links with separate Rx chains.
The feature I just described is called Enhanced Multi-link Single-Radio operation or EMLSR for short. This is an MLO feature which enables dynamic switching between multiple links with a low-cost and power conscious implementation.
When the EMLSR client receives certain control frames, the client can switch all chains to a single link in the MLD to Tx/Rx data frames.
I’m going to repeat this again. EMLSR can only Tx/Rx data frames over one link at a time. EMLSR mode “switches” between links. EMLSR does not aggregate the links.
So, how did I do this test?
First, I configured one SSID with tri-band operation and enabled MLO. When creating a new network in the Central WebUI, during the first step, expand “Advanced Settings” and “Miscellaneous”. Scroll down and toggle “Enable Multilink Operation” to enabled. This will apply mlo-enable to the wlan ssid-profile <profile> in the running config.
The version of code tested was AOS 10.7.0.0 90579 and the AP was managed by Central. 10.7 is the first version to support Wi-Fi 7 and requires Central.
Second, I configured the client. This required getting Linux Kernel 6.11 on the client. At the time of writing 6.11 was still in development without a stable release. When using 6.10, the client would not form a MLD.
Installing the latest kernel is easy on Ubuntu using the Ubuntu Mainline Kernel Installer (mainline). I used rc7.
The supplicant was wpa_supplicant compiled directly from source using git clone git://w1.fi/hostap.git. This will put you at the latest development version possible.
You can also get MLDs to form with v2.11 of wpa_supplicant. Grab and install with wget https://w1.fi/releases/wpa_supplicant-2.11.tar.gz and extract with tar -xvzf wpa_supplicant-2.11.tar.gz
You’ll need to install some dependencies. These should do the trick:
sudo apt install libssl-dev build-essential checkinstall pkg-config dbus libdbus-1-dev libdbus-glib-1-2 libdbus-glib-1-dev libreadline-dev libncurses5-dev libnl-genl-3-dev libnl-3-dev libnl-route-3-dev
Navigate to the wpa_supplicant directory and make sure to copy defconfig to .config.
cd wpa_supplicant
cp defconfig .config
Enable Wi-Fi 7 build configuration.
Use your favorite editor (I use neovim btw) uncomment the build configuration line with CONFIG_IEEE80211BE=y to enable Wi-Fi 7 features at the wpa_supplicant configuration level. At the time of writing, the wpa_supplicant code is still an experimental work in progress.
After this, we can do the standard make, sudo checkinstall or sudo make install steps. make install or checkinstall will install and should replace the current version. sudo checkinstall --install=no will create a package without installing.
If you want to speed up make, throw all your cores at make with make -j$(nproc). make will need to complete without errors before proceeding to the next step. If you run into errors, you need to figure those out before trying to install.
For the ThinkPad fans out there. You’ll probably know that the M.2 slot on the T450s is A keyed. For the Wi-Fi nerds out there, you’ll recognize that the Intel BE200 is E keyed. Meaning the BE200 doesn’t fit in an A keyed slot. In other words, the notch is in a different place for E key versus A key slots. delock has a nice post on different M.2 keys.
How did I solve that?
I cut the A keyed notch away to fit the E keyed Intel BE200 in the ThinkPad T450s. I used my Benchmade 535 Bugout EDC knife to do the job.
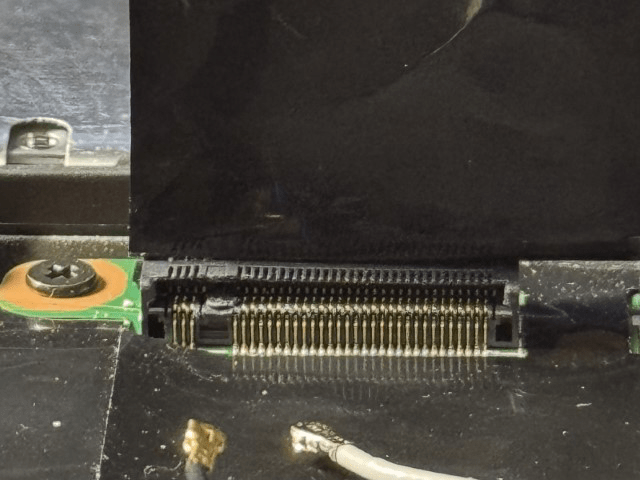
Word of caution. Be very careful if you go down this route. It’s easy to destroy the slot. I did need to use tweezers and some compressed air to clear the slot free from debris created by removing the notch with the knife. Good luck!
Update: I haven’t had issues with slow boots or resume from suspend with this setup.