<?xml version="1.0" encoding="utf-8"?><feed xmlns="http://www.w3.org/2005/Atom" xml:lang="en_US"><generator uri="https://jekyllrb.com/" version="3.10.0">Jekyll</generator><link href="https://wizardfi.com/feed.xml" rel="self" type="application/atom+xml" /><link href="https://wizardfi.com/" rel="alternate" type="text/html" hreflang="en_US" /><updated>2025-09-09T20:26:30+00:00</updated><id>https://wizardfi.com/feed.xml</id><title type="html">WizardFi</title><subtitle>Curb your Wi-Fi. A blog focused on 802.11 technologies.</subtitle><author><name>Josh Schmelzle</name></author><entry><title type="html">Friends don’t let friends hide SSIDs</title><link href="https://wizardfi.com/security/2025/09/08/friends-dont-let-friends-hide-SSIDs.html" rel="alternate" type="text/html" title="Friends don’t let friends hide SSIDs" /><published>2025-09-08T04:30:00+00:00</published><updated>2025-09-08T04:30:00+00:00</updated><id>https://wizardfi.com/security/2025/09/08/friends-dont-let-friends-hide-SSIDs</id><content type="html" xml:base="https://wizardfi.com/security/2025/09/08/friends-dont-let-friends-hide-SSIDs.html"><![CDATA[<p>A hidden SSID is like a speakeasy that is clearly there, but one that does not have a sign outside the establishment advertising the speakeasy. Hidden in plain sight, but discoverable. Every Wi-Fi network has a name referred to as a Service Set Identifier (SSID). This name shows up in the networks list on devices and are to distinguish Wi-Fi networks from one another in the same vicinity.</p>

<p>Broadcasting the SSID is like putting up a sign that says, “Potion of Connectivity”, “Ethernet of Enchantment”, “Dark LAN Arts” - an open invitation into the WizardFi speakeasy. But if one decides to “hide” the SSID, it’s like taking down the sign. Even though the Wi-Fi network is still there, the name doesn’t show up automatically on devices searching for a new Wi-Fi connection. If someone wants to join the hidden Wi-Fi network, they need to know the exact name to type in, along with the credentials.</p>

<p>While hiding your SSID is a way to make your Wi-Fi network less visible to nearby devices, hiding the SSID increases friction for people who are trying to find and connect on purpose. Hiding the SSID just removes the name from the advertisements.</p>

<h2 id="why-hidden-ssids-are-not-a-security-feature">Why hidden SSIDs are not a security feature</h2>

<p>Imagine your Wi-Fi network is like the hidden speakeasy. You might think if you don’t tell anyone about the speakeasy or put up a sign, then nobody will know it’s there, and it’ll be safe. But if someone really wanted to find the speakeasy, they could just walk around looking, and they might find yours.</p>

<p>When people talk about hiding the SSID, it’s like not having a sign with the establishment name on your building. The building is clearly still there, but with an empty string for the SSID. The SSID is the name of your Wi-Fi network. You might think if nobody can see the name, they won’t be able to join or get in, but that’s not really how this works. Just like someone can still find your speakeasy by looking, there are tools that let people see all the Wi-Fi networks around, even the “hidden” ones. Once they find the network, hiding the name doesn’t keep them out. Rather, it is good security that keeps them out.</p>

<p>What really keeps your Wi-Fi safe is using a good lock, which in Wi-Fi terms is like using a strong password, encryption, and key management (like WPA3). Even if someone knows your Wi-Fi is there, they can’t get in and patronize your speakeasy without knowing the proper credentials.</p>

<p>There are also other problems introduced by hiding SSIDs on processes like roaming between access points, device setup, and even privacy concerns!</p>

<h2 id="discovery-of-hidden-ssids">Discovery of hidden SSIDs</h2>

<p>Technically, hidden SSIDs can be discovered through:</p>

<ul>
  <li>Active probing with the SSID name</li>
  <li>Passive monitoring of probe requests</li>
  <li>Performing a deauth attack and then monitoring management frames when devices re-associate.</li>
</ul>

<h2 id="impact-of-hidden-ssids-on-device-setup">Impact of hidden SSIDs on device setup</h2>

<p>Virtually every device requires manual configuration steps to connect to hidden networks, which is very frustrating for the majority of users. The SSID has to be typed in as an exact match. Additionally, some devices may simply not support hidden networks. Some IoT devices don’t have provisioning that supports hidden networks.</p>

<h2 id="impact-of-hidden-ssids-on-privacy">Impact of hidden SSIDs on privacy</h2>

<p>When devices are configured to connect to hidden Wi-Fi networks, what ends up happening is that the device will constantly broadcast probe requests containing the hidden SSID(s) whenever the device is not in the vicinity of the network.</p>

<p>So, if your network name, “MagicMushroomLab”, is hidden at home, and you go to the office, your network name, “MagicMushroomLab” is constantly advertised by your device to everyone! Your device is broadcasting your “secret” network name everywhere you go.</p>

<p>Hiding your SSID reduces privacy compared to visible networks.</p>

<h2 id="impact-of-hidden-ssids-on-roaming">Impact of hidden SSIDs on roaming</h2>

<p>Let’s say you have a bunch of toy stores (which are like Wi-Fi access points) in a big mall, and you love visiting them to see if they have new toys. Now, imagine if some of these storefronts decided to become invisible - now they’re still there, but you can’t see what the store is as you walk by.</p>

<p>If you know exactly where one of these invisible stores is, you can go straight to it, confirm the store is your target by looking, and then enjoy what’s inside. But, if you’re just aimlessly walking around looking for a specific store, you’ll miss the store at first until you determine the store is, in fact, hidden. Your ability to find the store takes longer.</p>

<p>In a Wi-Fi network, when your device (like your tablet or phone) is moving around, the device tries to connect to the strongest signal so you can keep watching cat videos or playing video games without interruption. This is like you moving from one toy store to another in the mall, looking for the best toys. Normally, your device can see all the Wi-Fi access points (the toy stores) that are broadcasting their names (SSIDs), so the device knows where to switch to (roam to) get a better and stronger connection.</p>

<p>Wi-Fi roaming occurs when a device automatically switches its connection from one access point to another within the same network to maintain connectivity as the user moves around. The device monitors signal strength and other metrics in its green diamond about nearby access points. When the current connection becomes poor, the client will attempt to transition to a stronger access point without dropping the connection.</p>

<p>However, if some access points are hiding their SSIDs (they’re the invisible stores), your device doesn’t immediately see them as options to connect to, even if they might have the strongest signal at your current location. Your device needs to be specifically told where these hidden toy stores and access points are and actively look for them, which is like knowing exactly where the invisible toy store is in the mall. The device has to do this every time the device needs to roam. The process to find toy stores and roaming candidates takes more time and is inefficient!</p>

<p>Hidden SSIDs complicate the roaming process becuase clients cannot see the access points in passive scanning procedures. Hidden SSIDs force clients to actively probe for specific network names rather than passively listen for beacons. This is inefficient for roaming decisions because of the additional time it takes to discover hidden access points which can cause brief interruptions in connectivity during real time applications!</p>

<p>This makes it harder for your device to smoothly switch (roam) between multiple access points, like in a business, small and large offices, or across a school campus, because your device can’t quickly identify the next available connection point without constantly actively probing. Hidden SSIDs can slow down the process of switching to the best connection, causing interruptions or delays in whatever you’re doing online, especially real-time latency-sensitive applications like voice and video streaming.</p>

<h2 id="summary">Summary</h2>

<p>While hiding SSIDs might seem like it adds security, hiding SSIDs actually makes the Wi-Fi experience a bit more complicated and less smooth, especially when moving around.</p>

<p>In summary, hiding SSIDs creates a false sense of security while adding more problems and creating multiple issues! Hidden SSIDs are “security” through obscurity and do not solve a real security problem. Friends don’t let friends hide their SSIDs.</p>

<hr />

<p><a href="#top">↑ Top</a></p>]]></content><author><name>Josh Schmelzle</name></author><category term="security" /><category term="roaming" /><summary type="html"><![CDATA[A hidden SSID is like a speakeasy that is clearly there, but one that does not have a sign outside the establishment advertising the speakeasy. Hidden in plain sight, but discoverable. Every Wi-Fi network has a name referred to as a Service Set Identifier (SSID). This name shows up in the networks list on devices and are to distinguish Wi-Fi networks from one another in the same vicinity. Broadcasting the SSID is like putting up a sign that says, “Potion of Connectivity”, “Ethernet of Enchantment”, “Dark LAN Arts” - an open invitation into the WizardFi speakeasy. But if one decides to “hide” the SSID, it’s like taking down the sign. Even though the Wi-Fi network is still there, the name doesn’t show up automatically on devices searching for a new Wi-Fi connection. If someone wants to join the hidden Wi-Fi network, they need to know the exact name to type in, along with the credentials. While hiding your SSID is a way to make your Wi-Fi network less visible to nearby devices, hiding the SSID increases friction for people who are trying to find and connect on purpose. Hiding the SSID just removes the name from the advertisements. Why hidden SSIDs are not a security feature Imagine your Wi-Fi network is like the hidden speakeasy. You might think if you don’t tell anyone about the speakeasy or put up a sign, then nobody will know it’s there, and it’ll be safe. But if someone really wanted to find the speakeasy, they could just walk around looking, and they might find yours. When people talk about hiding the SSID, it’s like not having a sign with the establishment name on your building. The building is clearly still there, but with an empty string for the SSID. The SSID is the name of your Wi-Fi network. You might think if nobody can see the name, they won’t be able to join or get in, but that’s not really how this works. Just like someone can still find your speakeasy by looking, there are tools that let people see all the Wi-Fi networks around, even the “hidden” ones. Once they find the network, hiding the name doesn’t keep them out. Rather, it is good security that keeps them out. What really keeps your Wi-Fi safe is using a good lock, which in Wi-Fi terms is like using a strong password, encryption, and key management (like WPA3). Even if someone knows your Wi-Fi is there, they can’t get in and patronize your speakeasy without knowing the proper credentials. There are also other problems introduced by hiding SSIDs on processes like roaming between access points, device setup, and even privacy concerns! Discovery of hidden SSIDs Technically, hidden SSIDs can be discovered through: Active probing with the SSID name Passive monitoring of probe requests Performing a deauth attack and then monitoring management frames when devices re-associate. Impact of hidden SSIDs on device setup Virtually every device requires manual configuration steps to connect to hidden networks, which is very frustrating for the majority of users. The SSID has to be typed in as an exact match. Additionally, some devices may simply not support hidden networks. Some IoT devices don’t have provisioning that supports hidden networks. Impact of hidden SSIDs on privacy When devices are configured to connect to hidden Wi-Fi networks, what ends up happening is that the device will constantly broadcast probe requests containing the hidden SSID(s) whenever the device is not in the vicinity of the network. So, if your network name, “MagicMushroomLab”, is hidden at home, and you go to the office, your network name, “MagicMushroomLab” is constantly advertised by your device to everyone! Your device is broadcasting your “secret” network name everywhere you go. Hiding your SSID reduces privacy compared to visible networks. Impact of hidden SSIDs on roaming Let’s say you have a bunch of toy stores (which are like Wi-Fi access points) in a big mall, and you love visiting them to see if they have new toys. Now, imagine if some of these storefronts decided to become invisible - now they’re still there, but you can’t see what the store is as you walk by. If you know exactly where one of these invisible stores is, you can go straight to it, confirm the store is your target by looking, and then enjoy what’s inside. But, if you’re just aimlessly walking around looking for a specific store, you’ll miss the store at first until you determine the store is, in fact, hidden. Your ability to find the store takes longer. In a Wi-Fi network, when your device (like your tablet or phone) is moving around, the device tries to connect to the strongest signal so you can keep watching cat videos or playing video games without interruption. This is like you moving from one toy store to another in the mall, looking for the best toys. Normally, your device can see all the Wi-Fi access points (the toy stores) that are broadcasting their names (SSIDs), so the device knows where to switch to (roam to) get a better and stronger connection. Wi-Fi roaming occurs when a device automatically switches its connection from one access point to another within the same network to maintain connectivity as the user moves around. The device monitors signal strength and other metrics in its green diamond about nearby access points. When the current connection becomes poor, the client will attempt to transition to a stronger access point without dropping the connection. However, if some access points are hiding their SSIDs (they’re the invisible stores), your device doesn’t immediately see them as options to connect to, even if they might have the strongest signal at your current location. Your device needs to be specifically told where these hidden toy stores and access points are and actively look for them, which is like knowing exactly where the invisible toy store is in the mall. The device has to do this every time the device needs to roam. The process to find toy stores and roaming candidates takes more time and is inefficient! Hidden SSIDs complicate the roaming process becuase clients cannot see the access points in passive scanning procedures. Hidden SSIDs force clients to actively probe for specific network names rather than passively listen for beacons. This is inefficient for roaming decisions because of the additional time it takes to discover hidden access points which can cause brief interruptions in connectivity during real time applications! This makes it harder for your device to smoothly switch (roam) between multiple access points, like in a business, small and large offices, or across a school campus, because your device can’t quickly identify the next available connection point without constantly actively probing. Hidden SSIDs can slow down the process of switching to the best connection, causing interruptions or delays in whatever you’re doing online, especially real-time latency-sensitive applications like voice and video streaming. Summary While hiding SSIDs might seem like it adds security, hiding SSIDs actually makes the Wi-Fi experience a bit more complicated and less smooth, especially when moving around. In summary, hiding SSIDs creates a false sense of security while adding more problems and creating multiple issues! Hidden SSIDs are “security” through obscurity and do not solve a real security problem. Friends don’t let friends hide their SSIDs. ↑ Top]]></summary></entry><entry><title type="html">Three link MLO Wi-Fi 7 with the Intel BE200 and HPE Aruba Networking AP-735</title><link href="https://wizardfi.com/wifi7/2024/09/13/three-link-emlsr-mld-mlo-be200-hpe-aruba-networking-ap-735.html" rel="alternate" type="text/html" title="Three link MLO Wi-Fi 7 with the Intel BE200 and HPE Aruba Networking AP-735" /><published>2024-09-13T04:30:00+00:00</published><updated>2024-09-13T04:30:00+00:00</updated><id>https://wizardfi.com/wifi7/2024/09/13/three-link-emlsr-mld-mlo-be200-hpe-aruba-networking-ap-735</id><content type="html" xml:base="https://wizardfi.com/wifi7/2024/09/13/three-link-emlsr-mld-mlo-be200-hpe-aruba-networking-ap-735.html"><![CDATA[<p>Today, I was able to get a three link MLD setup with an Intel BE200 connected to an <a href="https://www.arubanetworks.com/products/wireless/access-points/indoor-access-points/730-series/">HPE Aruba Networking AP-735</a>. I used a ThinkPad T450s as the laptop which required some hardware modifications which are mentioned below in this post. <a href="#top"></a></p>

<p>That’s a link on 2.4 GHz, 5 GHz, and 6 GHz in the same Multi-Link Device (MLD) which is a feature of Multi-Link Operation (MLO) introduced in Wi-Fi 7. MLO is the main feature in the IEEE 802.11be specification and Wi-Fi 7 certification program.</p>

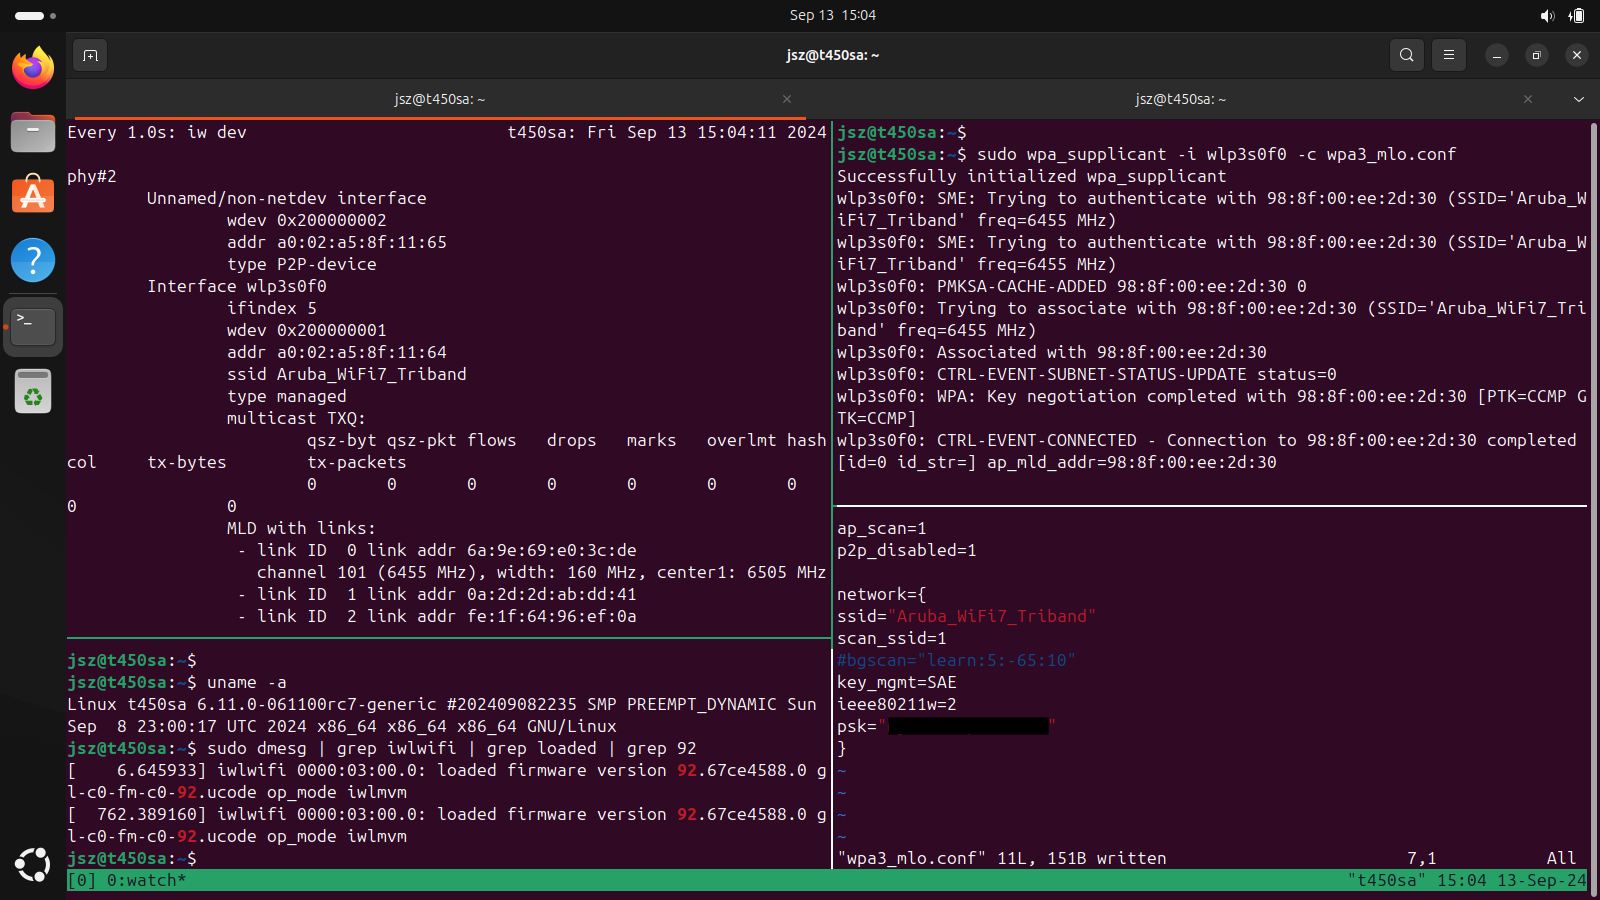
<p>Here is a screenshot showing the clients perspective:</p>

<p><img src="/assets/images/2024-09-13-mlo-t450s-tmux.png" alt="tmux session showing MLO" /></p>

<p>Commands used here:</p>

<ul>
  <li><a href="https://github.com/tmux/tmux/wiki">tmux</a> to split panes</li>
  <li><code class="language-plaintext highlighter-rouge">iw dev</code> will show you if there is an MLD.</li>
  <li><code class="language-plaintext highlighter-rouge">sudo wpa_supplicant -i wlp3s0f0 -c wpa3_mlo.conf</code> to run the config in the bottom right pane.</li>
</ul>

<p>Minimal wpa_supplicant config for WPA3-Personal (wpa3-sae):</p>

<div class="language-plaintext highlighter-rouge"><div class="highlight"><pre class="highlight"><code>ap_scan=1
p2p_disabled=1

network={
    ssid="&lt;ssid&gt;
    scan_ssid=1
    key_mgmt=SAE
    ieee80211w=2
    psk="&lt;passphrase&gt;"
}
</code></pre></div></div>

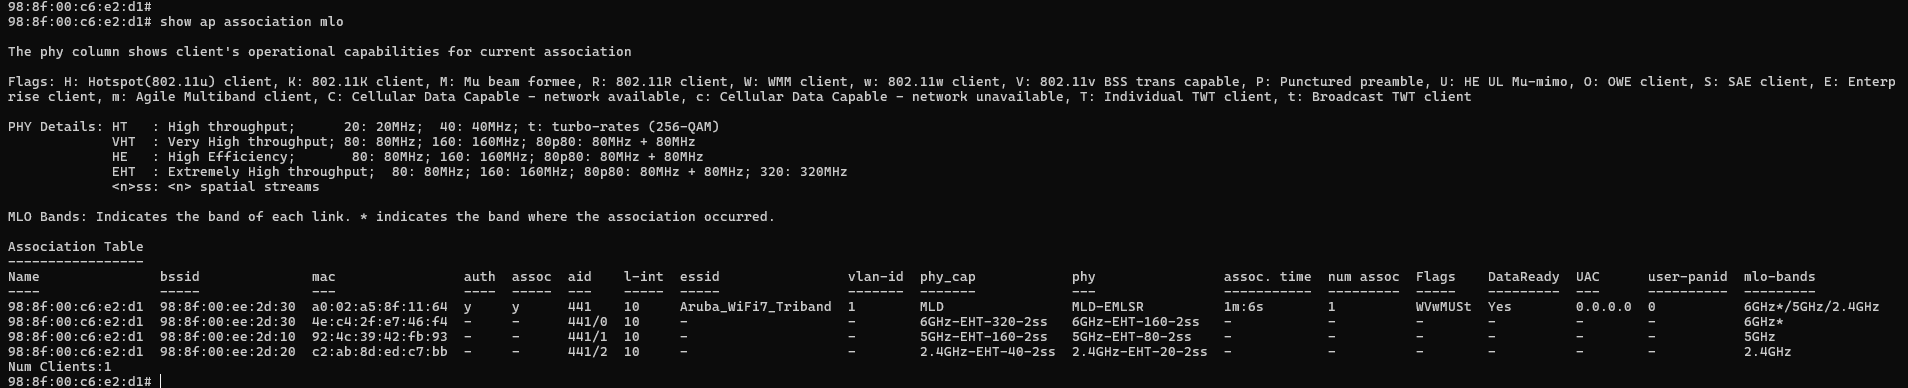
<p>Here is the AP perspective using <code class="language-plaintext highlighter-rouge">show ap association mlo</code>:</p>

<p><img src="/assets/images/2024-09-13-show-ap-association-mlo.png" alt="alt text" /></p>

<p>Let’s talk specifics. How many spatial streams (SS) or radio chains does the Intel BE200 have? The Intel BE200 is a 2 SS client and has two Rx/Tx chains. Most modern clients are 2 SS. There are certainly some products that have more, but the most common device these days are 2 SS for a number of reasons worth their own blog post.</p>

<p>When operating as a single-radio multi-link device, Wi-Fi 7 clients can listen for control frames and contend independently on different links by splitting Rx chains. This means the BE200 can listen simultaneously on different links with separate Rx chains.</p>

<p>The feature I just described is called Enhanced Multi-link Single-Radio operation or EMLSR for short. This is an MLO feature which enables dynamic switching between multiple links with a low-cost and power conscious implementation.</p>

<p>When the EMLSR client receives certain control frames, the client can switch all chains to a single link in the MLD to Tx/Rx data frames.</p>

<p>I’m going to repeat this again. EMLSR can only Tx/Rx data frames over one link at a time. EMLSR mode “switches” between links. EMLSR does not aggregate the links.</p>

<p>So, how did I do this test?</p>

<p>First, I configured one SSID with tri-band operation and enabled MLO. When creating a new network in the Central WebUI, during the first step, expand “Advanced Settings” and “Miscellaneous”. Scroll down and toggle “Enable Multilink Operation” to enabled. This will apply <code class="language-plaintext highlighter-rouge">mlo-enable</code> to the <code class="language-plaintext highlighter-rouge">wlan ssid-profile &lt;profile&gt;</code> in the running config.</p>

<p>The version of code tested was AOS 10.7.0.0 90579 and the AP was managed by Central. 10.7 is the first version to support Wi-Fi 7 and requires Central.</p>

<p>Second, I configured the client. This required getting Linux Kernel 6.11 on the client. At the time of writing 6.11 was still in development without a stable release. When using 6.10, the client would not form a MLD.</p>

<p>Installing the latest kernel is easy on Ubuntu using the <code class="language-plaintext highlighter-rouge">Ubuntu Mainline Kernel Installer</code> (<a href="https://github.com/bkw777/mainline">mainline</a>). I used rc7.</p>

<p>The supplicant was wpa_supplicant compiled directly from source using <code class="language-plaintext highlighter-rouge">git clone git://w1.fi/hostap.git</code>. This will put you at the latest development version possible.</p>

<p>You can also get MLDs to form with v2.11 of wpa_supplicant. Grab and install with <code class="language-plaintext highlighter-rouge">wget https://w1.fi/releases/wpa_supplicant-2.11.tar.gz</code> and extract with <code class="language-plaintext highlighter-rouge">tar -xvzf wpa_supplicant-2.11.tar.gz</code></p>

<p>You’ll need to install some dependencies. These should do the trick:</p>

<blockquote>
  <p><code class="language-plaintext highlighter-rouge">sudo apt install libssl-dev build-essential checkinstall pkg-config dbus libdbus-1-dev libdbus-glib-1-2 libdbus-glib-1-dev libreadline-dev libncurses5-dev libnl-genl-3-dev libnl-3-dev libnl-route-3-dev</code></p>
</blockquote>

<p>Navigate to the <code class="language-plaintext highlighter-rouge">wpa_supplicant</code> directory and make sure to copy defconfig to .config.</p>

<div class="language-plaintext highlighter-rouge"><div class="highlight"><pre class="highlight"><code>cd wpa_supplicant
cp defconfig .config
</code></pre></div></div>

<p>Enable Wi-Fi 7 build configuration.</p>

<p>Use your favorite editor (I use <a href="https://neovim.io/">neovim</a> btw) uncomment the build configuration line with <code class="language-plaintext highlighter-rouge">CONFIG_IEEE80211BE=y</code> to enable Wi-Fi 7 features at the wpa_supplicant configuration level. At the time of writing, the wpa_supplicant code is still an experimental work in progress.</p>

<p>After this, we can do the standard <code class="language-plaintext highlighter-rouge">make</code>, <code class="language-plaintext highlighter-rouge">sudo checkinstall</code> or <code class="language-plaintext highlighter-rouge">sudo make install</code> steps. <code class="language-plaintext highlighter-rouge">make install</code> or <code class="language-plaintext highlighter-rouge">checkinstall</code> will install and should replace the current version. <code class="language-plaintext highlighter-rouge">sudo checkinstall --install=no</code> will create a package without installing.</p>

<p>If you want to speed up <code class="language-plaintext highlighter-rouge">make</code>, throw all your cores at <code class="language-plaintext highlighter-rouge">make</code> with <code class="language-plaintext highlighter-rouge">make -j$(nproc)</code>. <code class="language-plaintext highlighter-rouge">make</code> will need to complete without errors before proceeding to the next step. If you run into errors, you need to figure those out before trying to install.</p>

<p>For the ThinkPad fans out there. You’ll probably know that the M.2 slot on the T450s is A keyed. For the Wi-Fi nerds out there, you’ll recognize that the Intel BE200 is E keyed. Meaning the BE200 doesn’t fit in an A keyed slot. In other words, the notch is in a different place for E key versus A key slots. <a href="https://www.delock.com/infothek/M.2_2022/M.2_e.html">delock has a nice post on different M.2 keys</a>.</p>

<p>How did I solve that?</p>

<p>I cut the A keyed notch away to fit the E keyed Intel BE200 in the ThinkPad T450s. I used my <a href="https://www.benchmade.com/products/535">Benchmade 535 Bugout</a> EDC knife to do the job.</p>

<p><img src="/assets/images/2024-09-13-cut-A-slot.png" alt="M.2 with the A notch cut" /></p>

<p>Word of caution. Be very careful if you go down this route. It’s easy to destroy the slot. I did need to use tweezers and some compressed air to clear the slot free from debris created by removing the notch with the knife. Good luck!</p>

<p>Update: I haven’t had issues with slow boots or resume from suspend with this setup.</p>

<hr />

<p><a href="#top">↑ Top</a></p>]]></content><author><name>Josh Schmelzle</name></author><category term="wifi7" /><category term="wifi7" /><summary type="html"><![CDATA[Today, I was able to get a three link MLD setup with an Intel BE200 connected to an HPE Aruba Networking AP-735. I used a ThinkPad T450s as the laptop which required some hardware modifications which are mentioned below in this post.]]></summary></entry><entry><title type="html">Why we transitioned from Hunting-and-Pecking to Hash-to-Element in WPA3-SAE Password Element Derivation</title><link href="https://wizardfi.com/security/2024/03/29/hash-to-curve.html" rel="alternate" type="text/html" title="Why we transitioned from Hunting-and-Pecking to Hash-to-Element in WPA3-SAE Password Element Derivation" /><published>2024-03-29T04:30:00+00:00</published><updated>2024-03-29T04:30:00+00:00</updated><id>https://wizardfi.com/security/2024/03/29/hash-to-curve</id><content type="html" xml:base="https://wizardfi.com/security/2024/03/29/hash-to-curve.html"><![CDATA[<p>In the ever-changing landscape of security protocols, standards continually adapt to address emerging threats and enhance security measures. Several years ago, Wi-Fi Protected Access 3 with Simultaneous Authentication of Equals (WPA3-SAE) underwent an update with the method of deriving the Password Element (PWE). This change involved the adoption of hash-to-element (H2E), a cryptographic technique also known as hash-to-curve (H2C), aimed at strengthening security against certain types of timing and side-channel attacks. This post will delve into some background and reasons behind the transition.</p>

<h2 id="motivation-for-wpa3-sae">Motivation for WPA3-SAE</h2>

<p>One of the problems with WPA2-Personal (WPA2-PSK) is Pre-Shared Key (PSK) security scheme. The scheme is solely based on the complexity of the provisioned password (thus a longer and more complex password is “better” when using PSKs) and also involves sending password-derived data over-the-air (OTA). In other words, the PSK approach is non-robust and is prone to offline dictionary attacks. All the attacker needs to do is capture the handshake which them to allows them to crack or guess the password by trying numerous possibilities offline. Once the password is cracked, the attacker can decrypt captured data.</p>

<p>WPA3-Personal addresses problems of WPA2-Personal by using a protocol called Simultaneous Authentication of Equals (SAE).</p>

<h2 id="simultaneous-authentication-of-equals">Simultaneous Authentication of Equals</h2>

<blockquote>
  <p>SAE authentication uses finite field cryptography to prove knowledge of a shared password</p>
</blockquote>

<p>Simultaneous Authentication of Equals (SAE) was originally defined in IEEE Std 802.11s™-2011 for WLAN mesh security. 7 years later, in 2018, the Wi-Fi Alliance (WFA) introduced WPA3.</p>

<p>SAE introduces a more secure handshake mechanism that mitigates the risks associated with PSK and does not require a long complex password to provide “better” security.</p>

<p>SAE utilizes a mechanism called a Zero Knowledge Proof (ZKP) which ensures that even if an attacker captures the handshake, the attacker cannot perform an offline dictionary attack to guess the password. This is because the ZKP requires interaction (mutual authentication) with the Access Point (AP) for each guess of the password.</p>

<p>Additionally, because interaction is required APs can implement rate limiting and other countermeasures to thwart online (active) dictionary attacks. This provides a significantly better defensive advantage than WPA2-Personal (WPA2-PSK)</p>

<p>Note that the terms WPA3-SAE and WPA3-Personal are interchangeable and refer to the same thing. I’ll use WPA3-SAE going forward.</p>

<h2 id="zero-knowledge-proof">Zero Knowledge Proof</h2>

<p><img src="/assets/images/2024-03-29-zkp_smallv2.png" alt="" /></p>

<p>A Zero Knowledge Proof (ZKP) is a cryptographic method where a client (the prover) can prove to the AP (the verifier) that a password is true, without revealing any information beyond the validity of the password itself. This means the client can demonstrate they know a password without actually disclosing the password itself.</p>

<p>A classic example of a Zero Knowledge Proof is the “cave” analogy, where a prover (client) claims to know the password to pass through a magical door in a circular cave. The verifier (AP) can repeatedly ask the prover (client) to emerge from either side of the cave, proving they can pass through the door without ever revealing the password. This is the essence of ZKPs: verifying the truth of a claim without knowing the actual content of the claim.</p>

<p>The Zero Knowledge Proof (ZKP) implemented in SAE is called the Dragonfly Key Exchange by author Dan Harkins and is defined in <a href="https://datatracker.ietf.org/doc/html/rfc7664" title="Dragonfly Key Exchange">RFC 7664</a>. Importantly, Dragonfly is an unpatented ZKP and is such that vendors across the Wi-Fi industry could implement it without the risk of lawyers and patent wars. Dragonfly is a Password Authenticated Key Exchange (PAKE) that provides mutual authentication with forward secrecy and prevents offline dictionary attacks.</p>

<h2 id="password-element-pwe">Password Element (PWE)</h2>

<p>In this key exchange, the Password Element (PWE) plays a key role functionally serving as the shared secret between two devices attempting to authenticate with each other without relying on a Pre-Shared Key (PSK) like we did with WPA2-Personal.</p>

<p>In Dragonfly, both the client and the AP convert the provisioned password to an element. During the commit phase, they both negotiate the shared key. After the commit phase, the confirm phase confirms the peer negotiated the same key.</p>

<p>The PWE is derived from a user-provisioned password and is used in conjunction with other parameters and operations during the authentication process as described above.</p>

<p>What you need to know is that the PWE is a transformed representation of the password that facilitates secure authentication between devices without exposing the original password itself.</p>

<h2 id="hunting-and-pecking-hnp">Hunting-and-Pecking (HNP)</h2>

<p><img src="/assets/images/2024-03-29_loopingv2.png" alt="" /></p>

<p>How do we get an element from a password in an unpatented manner that the industry can use and implement?</p>

<p>The original method to derive the PWE was via a looping mechanism called hunting-and-pecking (HNP) where the verifier (AP) does an interactive search to select a random element from a predefined set and perform operations to check whether the selected element meets the desired criteria.</p>

<p>Basically, hash the password (and some other stuff) and get a number. That number is then used to see if the equation for the elliptic curve produces something valid. If not, try incrementing, hash again, and try again.</p>

<p>Once the verifier (AP) finds an element that satisfies the requirements, the verifier (AP) uses the element to derive the Password Element (PWE). Conceptually this seemed sufficient during protocol design.</p>

<p>It turned out that security researchers quickly found that the implementation of hunting-and-pecking (HNP) for Password Element (PWE) derivation was not robust. Mathy Vanhoef and Eyal Ronen found some vulnerabilities coining them <a href="https://wpa3.mathyvanhoef.com/" title="Dragonblood: Analysing WPA3's Dragonfly Handshake">Dragonblood</a>.</p>

<p>The HNP method is a simple process that ended up leaking information. Primarily the number of times taken to find a valid element. This presented a dictionary partitioning attack where each connection attempt shaves down the number of possible passwords. A dictionary partitioning attack divides up a large dictionary of possible passwords into smaller subsets called partitions. The attacker then tests the partitions one by one, rather than trying each password individually. The idea is to identify which partition contains the correct password by observing the response to each subset. A dictionary partitioning attack is effective against APs that do not properly implement rate-limiting and lockout.</p>

<p>The solution to this problem is to loop a bunch of times even if the element is found on the first try, making guessing much harder. However, vendor implementations of the Dragonfly Key Exchange were also vulnerable to a side-channel attack. An attacker with device access could determine if the device found the element or not regardless of the number of loops.</p>

<p>Additionally, there was a side-channel attack against Brainpool curves, which are a set of elliptic curves defined over finite fields. Brainpool curves are often used in cryptographic applications due to their efficiency and security properties. Attacks against Brainpool curves are typically around exploiting information leaked through side channels (hence side-channel attack) during the execution of the cryptographic algorithm. Attackers analyze the side channels to potentially deduce information about the operations being performed, like deriving shared secrets. The attack on Brainpool curves was largely possible because code implementation were not written in constant time, which is fundamental in cryptographic algorithms to mitigate side-channel attacks.</p>

<p>The next few sections will provide some background on constant time coding and Brainpool curves.</p>

<h3 id="constant-time-coding">Constant Time Coding</h3>

<p>Let’s talk about constant time coding. Imagine you have a magic toy chest that holds many toys of different sizes and shapes. Next imagine you want to find your specific favorite toy. Let’s say your magic toy chest has a rule that no matter how many toys are inside, your toy will be found in the same amount of time. Thus, if you have 10 toys or 1000 toys in the chest, the chest will find your special toy in the same amount of time. That’s like constant time.</p>

<p>In code, when something is done in “constant time”, this means no matter how much data we must work with, the same amount of time is taken to do the thing.</p>

<p>Why is constant time coding important? Imagine the magic toy chest requires guessing a secret word to operate. Suppose you have a sneaky friend who is trying to open your toy chest to steal one of your toys. If the chest takes longer to say “Nope, your guess is wrong” when the guess is closer to the secret word, your sneaky friend might figure out the secret word by paying attention to how long the toy chest takes to answer.</p>

<p>This analogy illustrates a side-channel attack where the sneaky friend exploits indirect information - the time the chest takes to respond - to infer the secret word. Your friends’ method of listening to how long the chest takes to respond mirrors an attacker observing the time it takes for a device to process each key exchange attempt. Like your friend observing the response timing of the chest to narrow down the correct secret word, an attacker could determine if a device successfully found the correct element in the Dragonfly Key Exchange based on processing times, even without directly seeing the number of attempts or the exchanged data. The unintended leaking of information through processing times allowed attackers to indirectly infer the correct passphrase through the side-channel attack.</p>

<p>Vendors must implement SAE with constant time coding to protect against side-channel attacks.</p>

<h3 id="uniform-execution-paths">Uniform Execution Paths</h3>

<p><img src="/assets/images/2024-03-29-maze.png" alt="" /></p>

<p>In addition to execution timing, constant time coding also must ensure that the execution path does not vary based on input.</p>

<p>Imagine you’re navigating a maze to get to a treasure chest, and you have an observer watching from above, trying to guess the path you’ll take based on your movements.</p>

<p>In a non-constant time scenario, the path you take changes depending on the secret instructions you received before entering the maze. If the instructions are complex, you take longer routes with more turns; for simpler instructions, your path is shorter and more direct. The observer could deduce the complexity of your instructions based on these variations in your path.</p>

<p>In a constant time scenario, no matter the instructions, you always take the same amount of time and follow the same path to reach the treasure chest, performing some dummy loops or turns if necessary to make up the time when the instructions are too simple. To the observer, your path and the time it takes are always the same, making it impossible to infer anything about your secret instructions. This uniform execution path, much like in constant time coding, ensures that no external patterns or variations give away the secret, protecting the treasure chest (or password) from being inferred by watchers.</p>

<p>Vendors must implement SAE in a way that avoids conditional branches based on the password. The algorithm should not make decisions based on different password values that lead to different execution paths. For example, this means avoiding if-else conditions that depend on the passphrase contents.</p>

<h3 id="brainpool-curves">Brainpool Curves</h3>

<p>Now that we’ve covered constant time coding and uniform execution paths. What on earth are brainpool curves? Imagine you have a very big, squishy playdough ball. You can squish, stretch, and shape the ball into all sorts of shapes. In computers, cryptographers like to play with something similar, but instead of playdough, they use math to create special shapes called curves. These curves have special and precise rules about how they look.</p>

<p>A Brainpool curve is a special type of curve that cryptographers agreed to use for creating and keeping secrets safe. Just like you might have a secret handshake or secret language with a friend, computers use these curves to make sure their secrets can be shared without anyone else finding out. Brainpool curves are just one set of these curves that are known to be particularly good at keeping secrets. These curves make sure that when you send a secret over a technology communications medium, the secret is as safe as if you were to put the secret in a locked chest.</p>

<p>The security provided by Brainpool curves can be undermined by side-channel attacks, such as those that analyze the time it takes to perform cryptographic operations. Constant time coding ensures the operations take the same amount of time to execute, regardless of input values. If the execution time or execution path varies with different inputs, an attacker could potentially use the differences to infer secret keys.</p>

<h2 id="hash-to-curve-h2c">Hash-to-curve (H2C)</h2>

<p><img src="/assets/images/2024-03-29_direct.png" alt="" /></p>

<p>The solution to making the SAE mechanism for PWE derivation resistant to side-channel attacks was to find a way to directly obtain an element without hunting and pecking (HNP). A patent-free hash-to-curve algorithm from the Internet Research Task Force (IRTF) was found that could directly obtain an element, given a password. The algorithm is the Simplified Shallue-Woestijne-Ulas (SSWU) method<sup id="fnref:1" role="doc-noteref"><a href="#fn:1" class="footnote" rel="footnote">1</a></sup> first defined in <a href="https://datatracker.ietf.org/doc/draft-irtf-cfrg-hash-to-curve/04/">draft-irtf-cfrg-hash-to-curve</a> which was later replaced by <a href="https://datatracker.ietf.org/doc/rfc9380/">RFC 9380: Hashing to Elliptic Curves</a>.</p>

<p>This hash-to-curve (H2C) PWE derivation method produces a valid point on an elliptic curve satisfying the criteria by the curve’s equation. Hash-to-curve is implemented in constant time which solves the side-channel attacks on hunting-and-pecking (HNP) and works with all of the curves used by the Dragonfly Key Exchange.</p>

<h2 id="hash-to-element-h2e">Hash-to-element (H2E)</h2>

<p>WPA3-SAE was then modified to address Dragonblood, replacing HNP with H2C, remove unnecessary looping, and implemented in constant time to combat side-channel attacks.</p>

<p>The Wi-Fi Alliance ended up branding hash-to-curve (H2C) as hash-to-element (H2E). Cryptographers refer to the approach as hash-to-curve (H2C). The Wi-Fi Alliance labeled it as hash-to-element (H2E).</p>

<p>In the context of WPA3-SAE, the direct hashing, hash-to-curve cryptographic technique is called hash-to-element (H2E). This means you will see most Wi-Fi folks refer to H2C as H2E.</p>

<figure class="highlight"><pre><code class="language-python" data-lang="python"><span class="o">&gt;&gt;&gt;</span> <span class="n">H2C</span> <span class="o">==</span> <span class="n">H2E</span>
<span class="bp">True</span></code></pre></figure>

<h3 id="how-is-h2e-advertised">How is H2E advertised?</h3>

<p>So, how does the AP interoperate with clients that support WPA3 and HNP, but are not updated to support H2E?</p>

<p>In the legacy bands of 2.4 GHz and 5 GHz, AP vendors are mostly allowing the use of either HNP or H2E. Some vendors like Cisco make this configurable allowing administrators to disable use of HNP in legacy bands. Others like Aruba do not expose knobs and handle PWE options automatically.</p>

<p>Note that HNP is not allowed in 6 GHz or with Wi-Fi 7 connectivity. I’ll touch on that a bit later.</p>

<h4 id="beacons-and-probe-responses">Beacons and Probe Responses</h4>

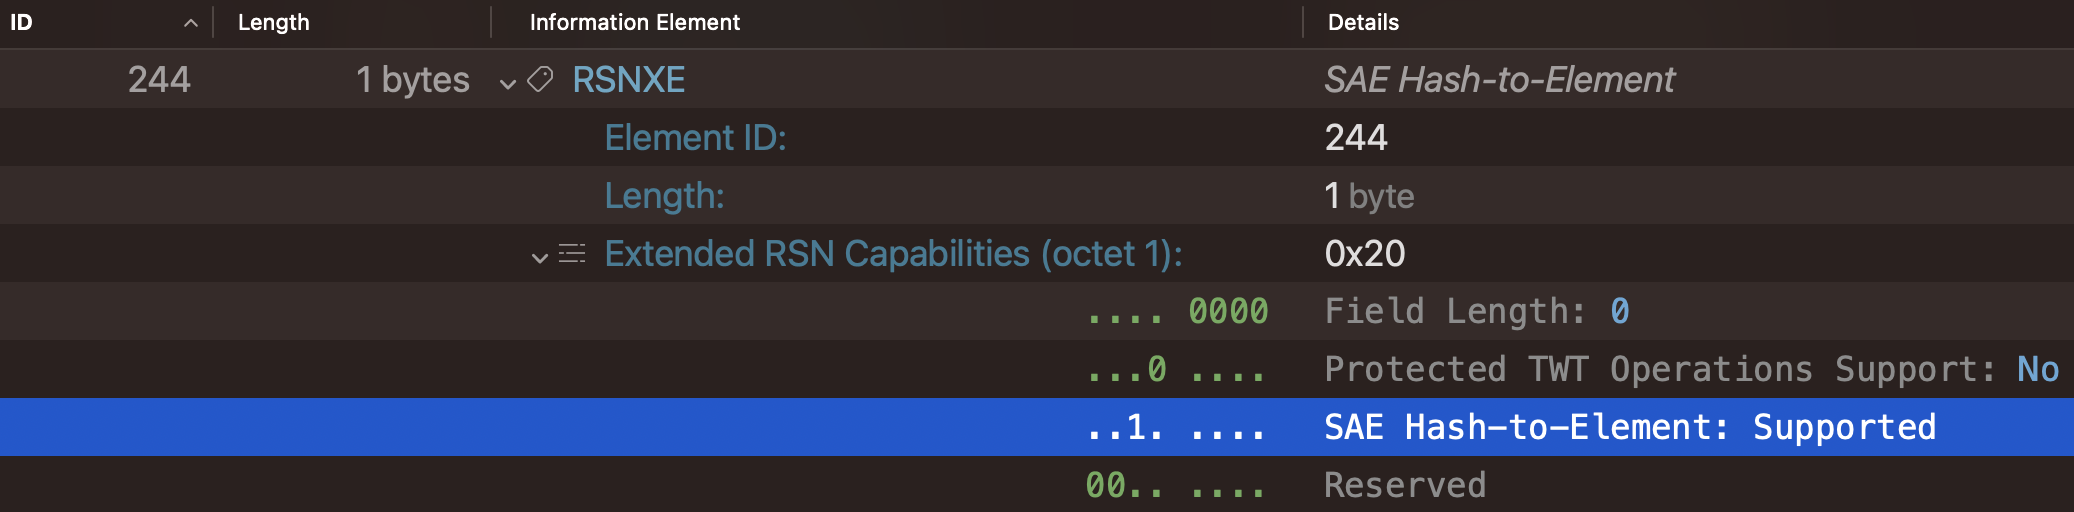
<p>The AP advertises hash-to-element (H2E) capability through Beacons and Probe Responses with the RSN Extension IE (RSNXE).</p>

<p><img src="/assets/images/2024-03-29-rsnxe.png" alt="" /></p>

<h4 id="authentication">Authentication</h4>

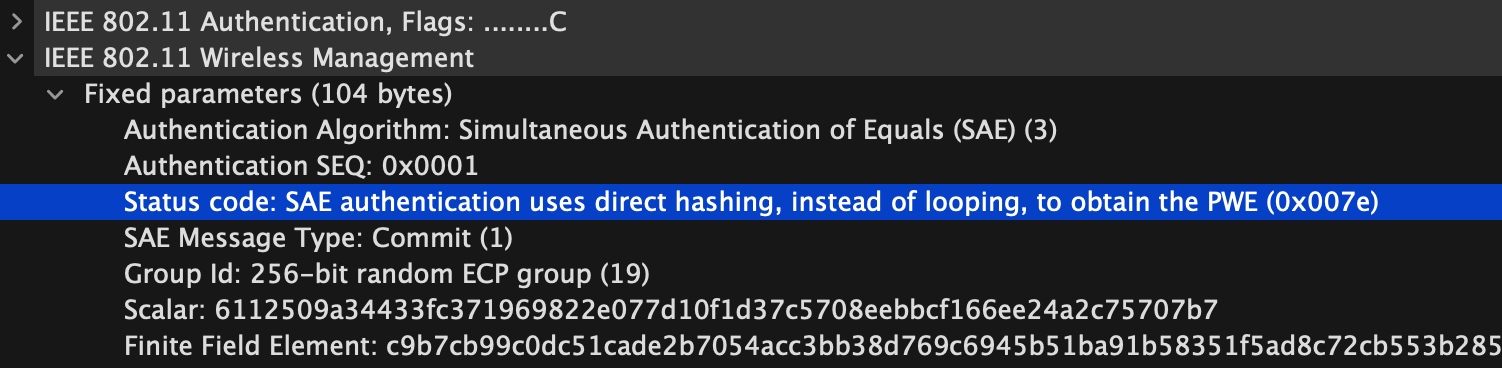
<p>Clients indicate which PWE method they are using during the first message of the SAE commit exchange. If the client sends status code 126 in the authentication frame, the client is using H2E for PWE derivation.</p>

<p><img src="/assets/images/2024-03-29-authentication.png" alt="" /></p>

<h2 id="client-support-for-h2e">Client support for H2E</h2>

<p>The majority of client vendors began supporting H2E in 2021.</p>

<ul>
  <li>Android 12+</li>
  <li>iOS 16+</li>
  <li>Linux wpa_supplicant v2.10+</li>
  <li>macOS Ventura+</li>
  <li>Windows 10 21H2+</li>
  <li>Windows 11+</li>
</ul>

<p>If this list is inaccurate or you have more specific information about when clients started supporting H2E, please shoot me an email so I can update this post.</p>

<h2 id="wi-fi-alliance-role-in-h2e">Wi-Fi Alliance Role in H2E</h2>

<p>The Wi-Fi Alliance decided to make H2E mandatory for certified devices in the following bands of operation and Wi-Fi iterations. This is because the vulnerabilities highlighted by Dragonblood demonstrate without proper protocol implementation and countermeasures in place, attackers could potentially exploit side-channel attacks to compromise Wi-Fi security.</p>

<h3 id="wi-fi-6e">Wi-Fi 6E</h3>

<p>Because there are no legacy (Wi-Fi 5 or older) clients in 6 GHz and Dragonblood went public prior to the unlicensing of 6 GHz, when using WPA3-SAE in 6 GHz operation, APs and clients must use H2E. HNP is not allowed.</p>

<h3 id="wi-fi-7">Wi-Fi 7</h3>

<p>Wi-Fi 6 (802.11ax) and Dragonblood were released in the same year. So, the next iteration of Wi-Fi with version 7 presented the opportunity to make H2E mandatory for the next generation of certified devices. When using WPA3-SAE with Wi-Fi 7 in any band of operation, clients must use H2E to obtain the PWE. HNP is not allowed.</p>

<h2 id="conclusion">Conclusion</h2>

<p>The transition from hunting-and-peeking (HNP) and adoption of hash-to-element (H2E) for PWE derivation in WPA3-SAE represent a step forward in improving Wi-Fi security. The WPA3-SAE protocol with H2E and the protocol properly implemented is resistant to side-channel attacks, providing users with better confidence in the integrity of their Wi-Fi networks. In this era of increasing security concerns, protocols like WPA3-SAE play a critical role in safeguarding Wi-Fi communications. The transition to hash-to-element for PWE derivation shows how the Wi-Fi industry finds ways to improve when necessary.</p>

<hr />

<p><strong>Thanks</strong> to Guillaume (GG) and Colin Vallance for reading drafts of this and providing feedback.</p>

<p><a href="#top">↑ Top</a></p>
<div class="footnotes" role="doc-endnotes">
  <ol>
    <li id="fn:1" role="doc-endnote">
      <p>IEEE 802.11-19/1173r17 <a href="#fnref:1" class="reversefootnote" role="doc-backlink">&#8617;</a></p>
    </li>
  </ol>
</div>]]></content><author><name>Josh Schmelzle</name></author><category term="security" /><category term="wpa3sae" /><summary type="html"><![CDATA[In the ever-changing landscape of security protocols, standards continually adapt to address emerging threats and enhance security measures. Several years ago, Wi-Fi Protected Access 3 with Simultaneous Authentication of Equals (WPA3-SAE) underwent an update with the method of deriving the Password Element (PWE). This change involved the adoption of hash-to-element (H2E), a cryptographic technique also known as hash-to-curve (H2C), aimed at strengthening security against certain types of timing and side-channel attacks. This post will delve into some background and reasons behind the transition.]]></summary></entry><entry><title type="html">Origins of the Reduced Neighbor Report</title><link href="https://wizardfi.com/wifi6e/2024/03/04/reduced-neighbor-report.html" rel="alternate" type="text/html" title="Origins of the Reduced Neighbor Report" /><published>2024-03-04T16:00:00+00:00</published><updated>2024-03-04T16:00:00+00:00</updated><id>https://wizardfi.com/wifi6e/2024/03/04/reduced-neighbor-report</id><content type="html" xml:base="https://wizardfi.com/wifi6e/2024/03/04/reduced-neighbor-report.html"><![CDATA[<p>🏘️</p>

<p>The Reduced Neighbor Report is an Information Element used by multi-band APs to inform clients about neighboring BSSIDs and SSIDs.</p>

<h2 id="objective">Objective</h2>

<p>The primary objective of the Reduced Neighbor Report (RNR) is to enable clients to discover BSSIDs and SSIDs in 6 GHz by scanning only 2.4 GHz and 5 GHz.</p>

<h2 id="industry-ready">Industry Ready</h2>

<p>One of the ways the industry is making this happen is through the Wi-Fi Alliance. The test plan for Wi-Fi 6E includes out-of-band discovery and expects the Reduced Neighbor Report to be present. This means the Wi-Fi Alliance is testing APs for out-of-band discovery behavior. The Reduced Neighbor Report is also a <a href="https://www.wi-fi.org/discover-wi-fi/wi-fi-optimized-connectivity">Wi-Fi Optimized Connectivity</a> feature.</p>

<h2 id="common-misunderstandings">Common Misunderstandings</h2>

<p><a href="https://rowelldionicio.com/reduced-neighbor-report-plays-a-critical-role-in-wi-fi-6e/">Some</a> <a href="https://mrncciew.com/2023/10/10/6ghz-ap-discovery-part-5/">bloggers</a> in the WLAN community have stated the Reduced Neighbor Report (RNR) is from 802.11k-2008, but that is not entirely true. 802.11k introduces the ability for clients to explicitly request a neighbor report and then receive a response with roaming candidates of neighboring APs. The Reduced Neighbor Report (RNR) we see in current implementation does <strong>not</strong> require a specific request-response cycle. 802.11k also does not contain the definition for the RNR Information Element (IE).</p>

<p>What is true is that the idea of the Reduced Neighbor Report (RNR) comes from 802.11k-2008, but the actual definition (IE 201) is not until later, between the 2012 and 2016 rollups. The amendment that first defines the RNR IE is 802.11af-2013 (TV White Spaces).</p>

<p>While 802.11k does not define the RNR IE, 802.11k is still useful for out-of-band discovery. 802.11k can inform clients of 6 GHz neighbors in the neighbor report response. This means you should consider enabling 802.11k on both out-of-band and in-band SSIDs on 6 GHz capable APs. In most cases, you should deploy dual-band SSIDs on 5 GHz and 6 GHz. When the client connects on 5 GHz, the AP can inform the client of 6 GHz neighbors in the neighbor report response and through the RNR IE.</p>

<p>The Reduced Neighbor Report IE is automatically advertised in every beacon and probe response in 2.4 GHz and 5 GHz on capable APs. Note that some vendors are even adding the Reduced Neighbor Report in 6 GHz.</p>

<p>Does this mean that the Reduced Neighbor Report completely solves discovery of 6 GHz networks? No, it does not. The RNR IE is only a helper for what is often the first step of 6 GHz discovery. The RNR is like a seed. After parsing the RNR, a 6 GHz capable client will have to take action and switch its radio from out-of-band to in-band and either actively (probe) or passively (listen) discover on the target channel.</p>

<h2 id="rnr-information-element">RNR Information Element</h2>

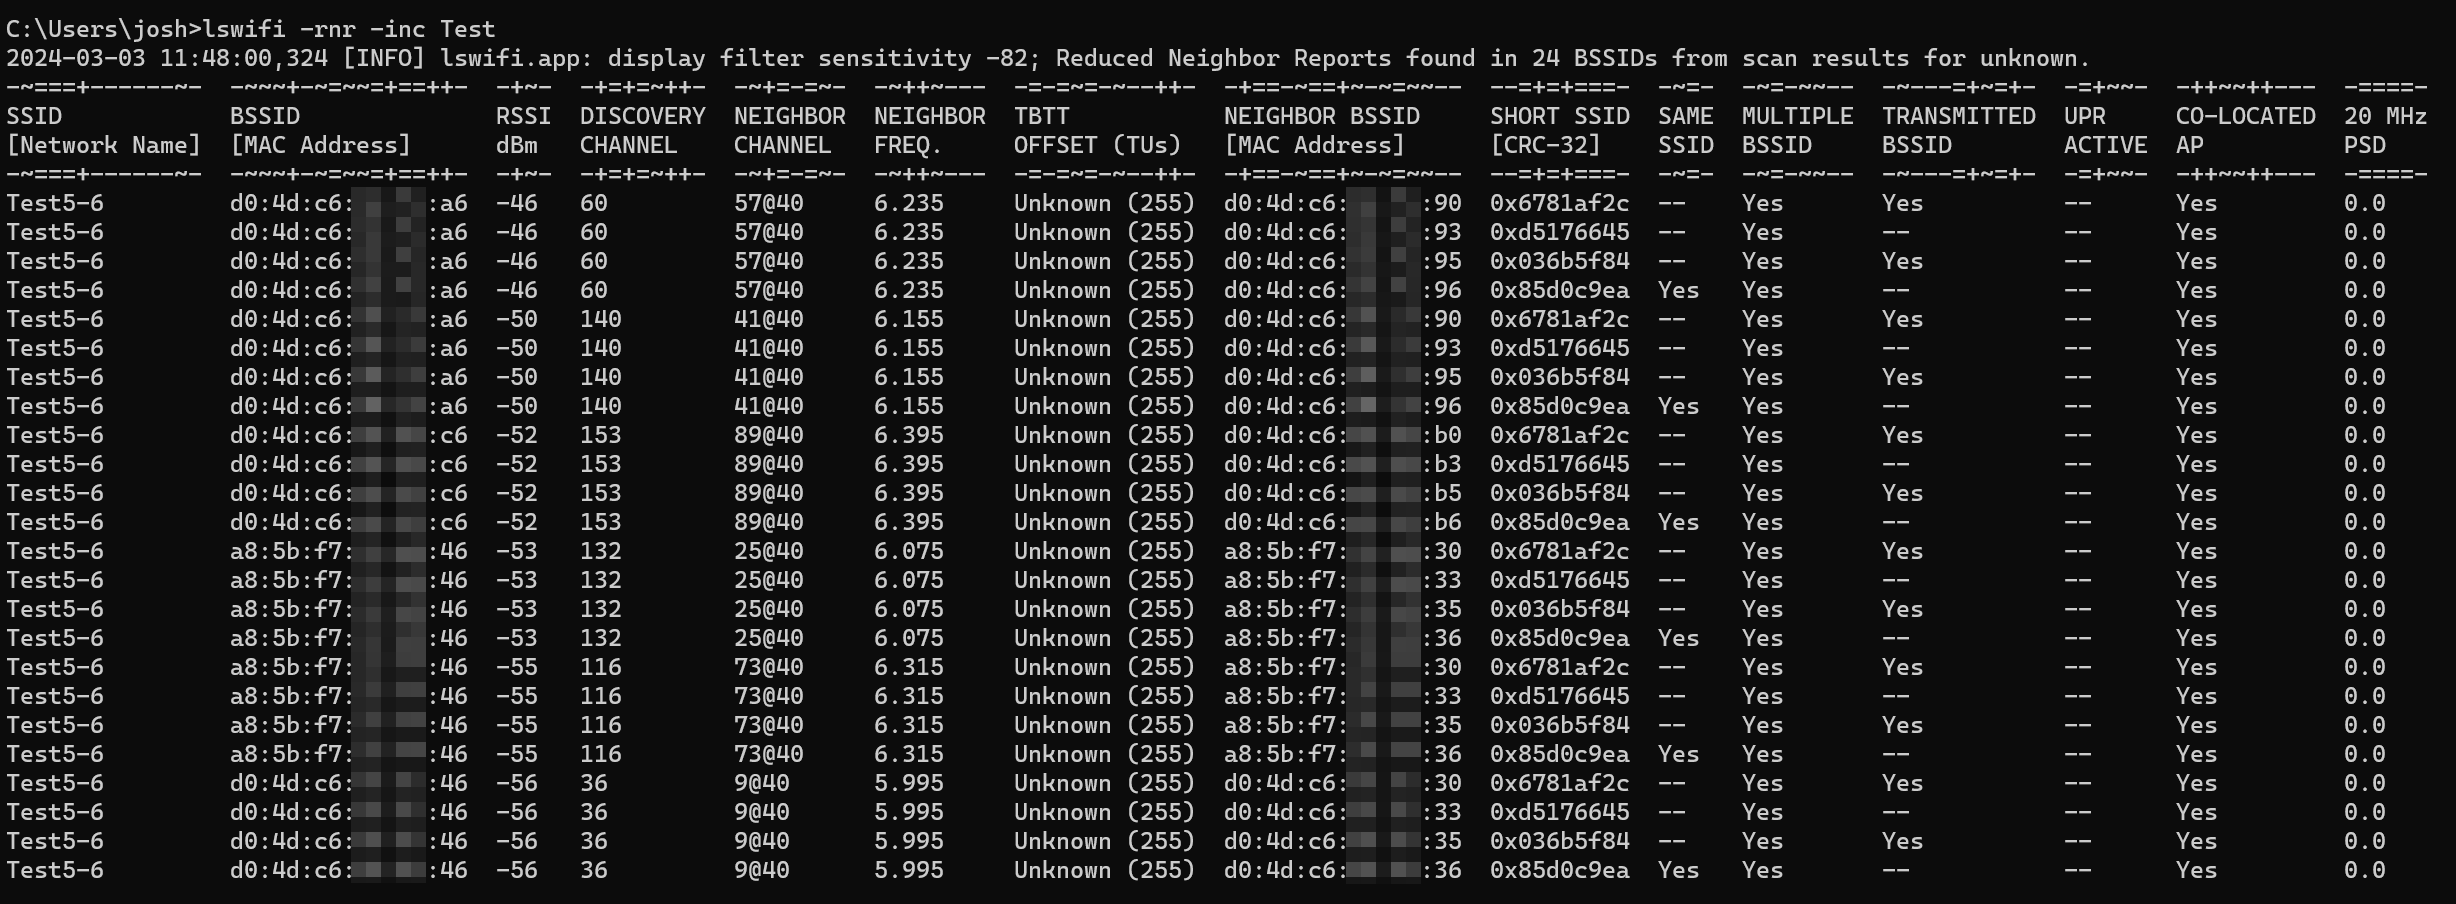
<p>The Reduced Neighbor Report (RNR) Information Element (IE) carries some key details about the BSSIDs and SSIDs in 6 GHz:</p>

<ul>
  <li>BSSID</li>
  <li>SSID via Short SSID (one-way 4-byte CRC of the SSID in 6 GHz)</li>
  <li>Operating class (see Annex E Table E-4 in IEEE 802.11ax-2021 or later for 6 GHz operating classes)</li>
  <li>Operating channel</li>
  <li>BSS Parameters
    <ul>
      <li>If OCT is recommended</li>
      <li>If the neighboring SSID is the same or not as the current frame</li>
      <li>If the neighbor is using Multiple BSSID (MBSSID)</li>
      <li>If the neighbor is the transmitted BSSID or a non-transmitted BSSID (a MBSSID construct)</li>
      <li>If Unsolicited Broadcast Probe Responses are active or not</li>
      <li>If the neighboring BSSID and SSID are co-located or not</li>
    </ul>
  </li>
  <li>20 MHz PSD</li>
</ul>

<p>Please note this list is not exhaustive. Wi-Fi 7 also extends the Reduced Neighbor Report by adding Multi-Link Device (MLD) parameters. Those won’t be covered in this post.</p>

<p>Capable clients can use information from the RNR data to seed discovery of 6 GHz networks.</p>

<p>Here is an example of how the RNR data from 2.4 GHz and 5 GHz scans can be visualized with <a href="https://github.com/joshschmelzle/lswifi"><code class="language-plaintext highlighter-rouge">lswifi -rnr</code></a>:</p>

<p><img src="/assets/images/2024-03-04-lswifi-rnr.png" alt="" /></p>

<h2 id="faq">FAQ:</h2>

<p>Q. Which management frames carry the RNR?<br />
A. Beacons and probe responses.</p>

<p>Q. Will my dual-band 2.4 GHz and 5 GHz AP use the RNR?<br />
A. You will likely need a 6 GHz capable AP.</p>

<p>Q. Does the RNR help for 6 GHz only SSIDs?<br />
A. Yes. A 2.4 GHz or 5 GHz RNR can point to a different SSID in 6 GHz.</p>

<p>Q. Does the RNR speed up 6 GHz discovery?<br />
A. It can. The RNR includes a channel indication and Target Beacon Transmission Time (TBTT) offset which can tell the client exactly which channel to look for and when.</p>

<p>Q. Why would a client parse beacon frames from SSIDs that it doesn’t care about?<br />
A. How does the client know whether or not it cares about a beacon frame or probe response frame without first parsing the frame to determine whether to ignore? The majority of 6 GHz clients will use out-of-band scans to seed 6 GHz discovery.</p>

<p>Q. How is the RNR configured?<br />
A. Automatically on capable APs. Typically on SSIDs with operation on 2.4 GHz and 5 GHz. On a 6 GHz capable multi-band AP, along with an SSID on 6 GHz, enable an SSID on 2.4 GHz or 5 GHz radio.</p>

<p>Q. Do I need a 6 GHz NIC to detect RNR frames?<br />
A. No. “Legacy” NICs can detect the RNR through existing scans and frames seen in 2.4 GHz and 5 GHz. Try <a href="https://github.com/joshschmelzle/lswifi"><code class="language-plaintext highlighter-rouge">lswifi -rnr</code></a> in air space with multi-band 6 GHz APs present to see for yourself.</p>

<hr />

<p><strong>Thanks</strong> to Keith Miller for reading drafts of this and Adrián Granados for the additions to the misunderstandings.</p>

<p><a href="#top">↑ Top</a></p>]]></content><author><name>Josh Schmelzle</name></author><category term="wifi6e" /><category term="wiif6e" /><category term="discovery" /><summary type="html"><![CDATA[🏘️]]></summary></entry><entry><title type="html">Installing iperf2 on Apple silicon from source</title><link href="https://wizardfi.com/tools/2023/05/04/iperf2-on-macos-m2.html" rel="alternate" type="text/html" title="Installing iperf2 on Apple silicon from source" /><published>2023-05-04T16:00:00+00:00</published><updated>2023-05-04T16:00:00+00:00</updated><id>https://wizardfi.com/tools/2023/05/04/iperf2-on-macos-m2</id><content type="html" xml:base="https://wizardfi.com/tools/2023/05/04/iperf2-on-macos-m2.html"><![CDATA[<p>This post is about installing iperf2 from source on Mac computers with Apple silicon. The target machine used as an example is an Apple MacBook Pro 2023 with an Apple M2 Pro chip. I’ve also come back to this post in 2024 and done the same steps with an M3 MBP to install a newer version of iperf2. <a href="#top"></a></p>

<p><strong>Table of Contents</strong></p>

<ul id="markdown-toc">
  <li><a href="#choosing-between-iperf2-and-iperf3" id="markdown-toc-choosing-between-iperf2-and-iperf3">Choosing between iperf2 and iperf3</a></li>
  <li><a href="#dependencies" id="markdown-toc-dependencies">Dependencies</a></li>
  <li><a href="#download-source" id="markdown-toc-download-source">Download source</a></li>
  <li><a href="#make" id="markdown-toc-make">Make</a></li>
  <li><a href="#run" id="markdown-toc-run">Run!</a></li>
  <li><a href="#explore-the-arguments" id="markdown-toc-explore-the-arguments">Explore the arguments</a>    <ul>
      <li><a href="#quick-start-for-client-mode" id="markdown-toc-quick-start-for-client-mode">Quick start for client mode</a></li>
      <li><a href="#usage-examples" id="markdown-toc-usage-examples">Usage examples</a></li>
    </ul>
  </li>
</ul>

<p>:cat:</p>

<h2 id="choosing-between-iperf2-and-iperf3">Choosing between iperf2 and iperf3</h2>

<p>While iperf3 may seem like an upgrade over iperf2 based on version numbers alone, they’re different tools with different strengths.</p>

<p>Why does this matter?</p>

<p>Networking testing at gigabit and beyond speeds requires threading to fully saturate interfaces.</p>

<p>Without adequate threading:</p>

<ul>
  <li>You may not fully utilize the available bandwidth</li>
  <li>Test results may not reflect actual performance</li>
  <li>Multiple CPU cores may remain untapped</li>
</ul>

<p>iperf2 and iperf3 are both actively maintained tools. While iperf3 recently added threading support, iperf2 offers a few benefits over iperf3 for high-performance networks. For more detailed feature comparisons see the <a href="https://iperf2.sourceforge.io/iperfCompare.html">official iperf2 comparison documentation</a>.</p>

<p>Here’s the rub.</p>

<p>Sometimes the iperf2 version provided by the system package repositories is outdated. Here is how we can compile iperf2 from source.</p>

<h2 id="dependencies">Dependencies</h2>

<p>Open a terminal emulator (either the included one or something like <a href="https://iterm2.com/">iTerm2</a>).</p>

<ol>
  <li>Install <a href="https://brew.sh/">Homebrew</a> following ths instructions on their webpage.</li>
  <li>Install dependencies required to build and make iperf2.</li>
</ol>

<div class="language-bash highlighter-rouge"><div class="highlight"><pre class="highlight"><code>brew <span class="nb">install </span>gcc automake
</code></pre></div></div>

<p>If you were on something like Debian, you’d want these depends:</p>

<div class="language-bash highlighter-rouge"><div class="highlight"><pre class="highlight"><code><span class="nb">sudo </span>apt-get <span class="nb">install </span>build-essential g++ automake autoconf
</code></pre></div></div>

<h2 id="download-source">Download source</h2>

<p>Go to <a href="https://sourceforge.net/projects/iperf2/">https://sourceforge.net/projects/iperf2/</a>, click on the <code class="language-plaintext highlighter-rouge">Files</code> tab, and download the <code class="language-plaintext highlighter-rouge">.tar.gz</code> file for your desired version.</p>

<p>In the original post, I used 2.1.9. Here are some of the download URLs:</p>

<ul>
  <li>2.1.9: <a href="https://sourceforge.net/projects/iperf2/files/iperf-2.1.9.tar.gz/download">https://sourceforge.net/projects/iperf2/files/iperf-2.1.9.tar.gz/download</a></li>
  <li>2.2.0: <a href="https://sourceforge.net/projects/iperf2/files/iperf-2.2.0.tar.gz/download">https://sourceforge.net/projects/iperf2/files/iperf-2.2.0.tar.gz/download</a></li>
  <li>2.2.1: <a href="https://sourceforge.net/projects/iperf2/files/iperf-2.2.1.tar.gz/download">https://sourceforge.net/projects/iperf2/files/iperf-2.2.1.tar.gz/download</a></li>
</ul>

<p>Place the zip file somewhere on your machine like <code class="language-plaintext highlighter-rouge">~/Downloads</code>.</p>

<p>Enter that directory in your terminal.</p>

<p>Extract and enter the directory using <code class="language-plaintext highlighter-rouge">tar -xvf &lt;archive&gt;</code> like so:</p>

<div class="language-bash highlighter-rouge"><div class="highlight"><pre class="highlight"><code><span class="nb">cd</span> ~/Downloads
<span class="nb">tar</span> <span class="nt">-xvf</span> iperf-2.2.0.tar.gz
<span class="nb">cd </span>iperf-2.2.0
</code></pre></div></div>

<h2 id="make">Make</h2>

<p>If you’ve not already entered the directory from the previous step, do so now.</p>

<ol>
  <li>Run <code class="language-plaintext highlighter-rouge">./configure</code> to configure the for our machine:</li>
</ol>

<div class="language-bash highlighter-rouge"><div class="highlight"><pre class="highlight"><code>./configure
</code></pre></div></div>

<ol>
  <li>Compile iperf2 with <code class="language-plaintext highlighter-rouge">make</code>:</li>
</ol>

<div class="language-bash highlighter-rouge"><div class="highlight"><pre class="highlight"><code>make
</code></pre></div></div>

<ol>
  <li>Install iperf2</li>
</ol>

<div class="language-bash highlighter-rouge"><div class="highlight"><pre class="highlight"><code><span class="nb">sudo </span>make <span class="nb">install</span>
</code></pre></div></div>

<ol>
  <li>Verify install:</li>
</ol>

<p>Run <code class="language-plaintext highlighter-rouge">which iperf</code> and <code class="language-plaintext highlighter-rouge">iperf -v</code>:</p>

<div class="language-bash highlighter-rouge"><div class="highlight"><pre class="highlight"><code>which iperf
/usr/local/bin/iperf

iperf <span class="nt">-v</span>
iperf version 2.2.0 <span class="o">(</span>10 April 2024<span class="o">)</span> pthreads
</code></pre></div></div>

<h2 id="run">Run!</h2>

<p>On first run, you will likely need to allow <code class="language-plaintext highlighter-rouge">iperf</code> to accept incoming network connections when running in server mode (with <code class="language-plaintext highlighter-rouge">-s</code>).</p>

<p>MBP M2 (iperf2 v2.1.9):</p>

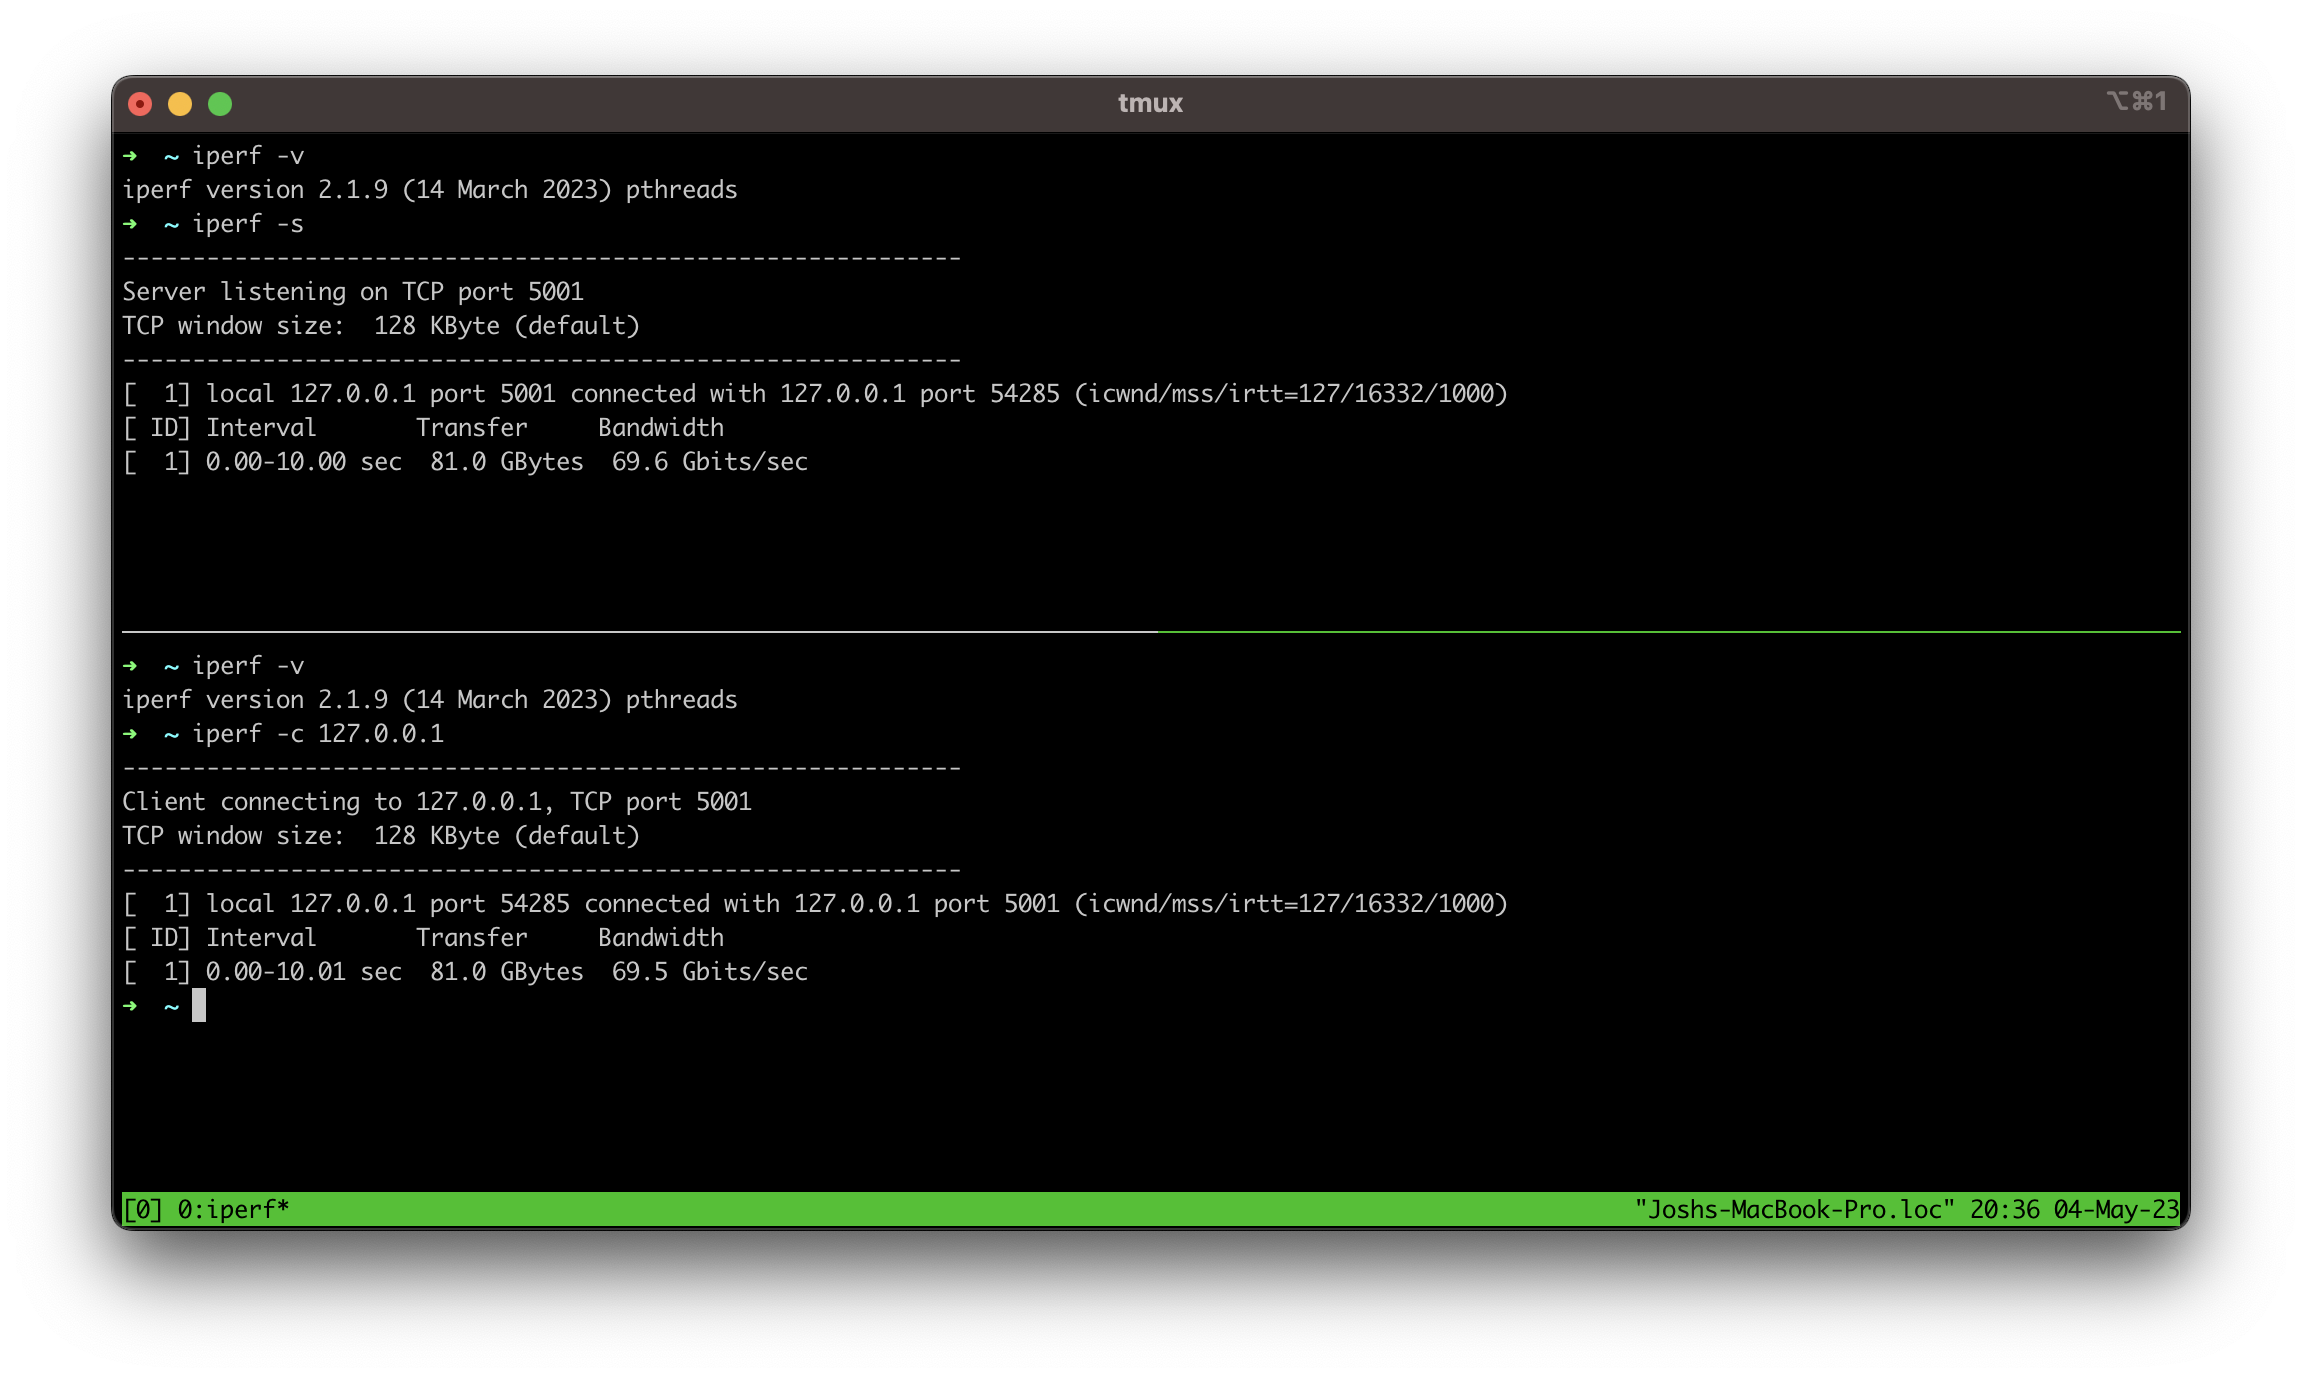
<p><img width="1151" alt="image" src="/assets/images/2023-05-04-mbp-m2-iperf-v2.1.9.png" /></p>

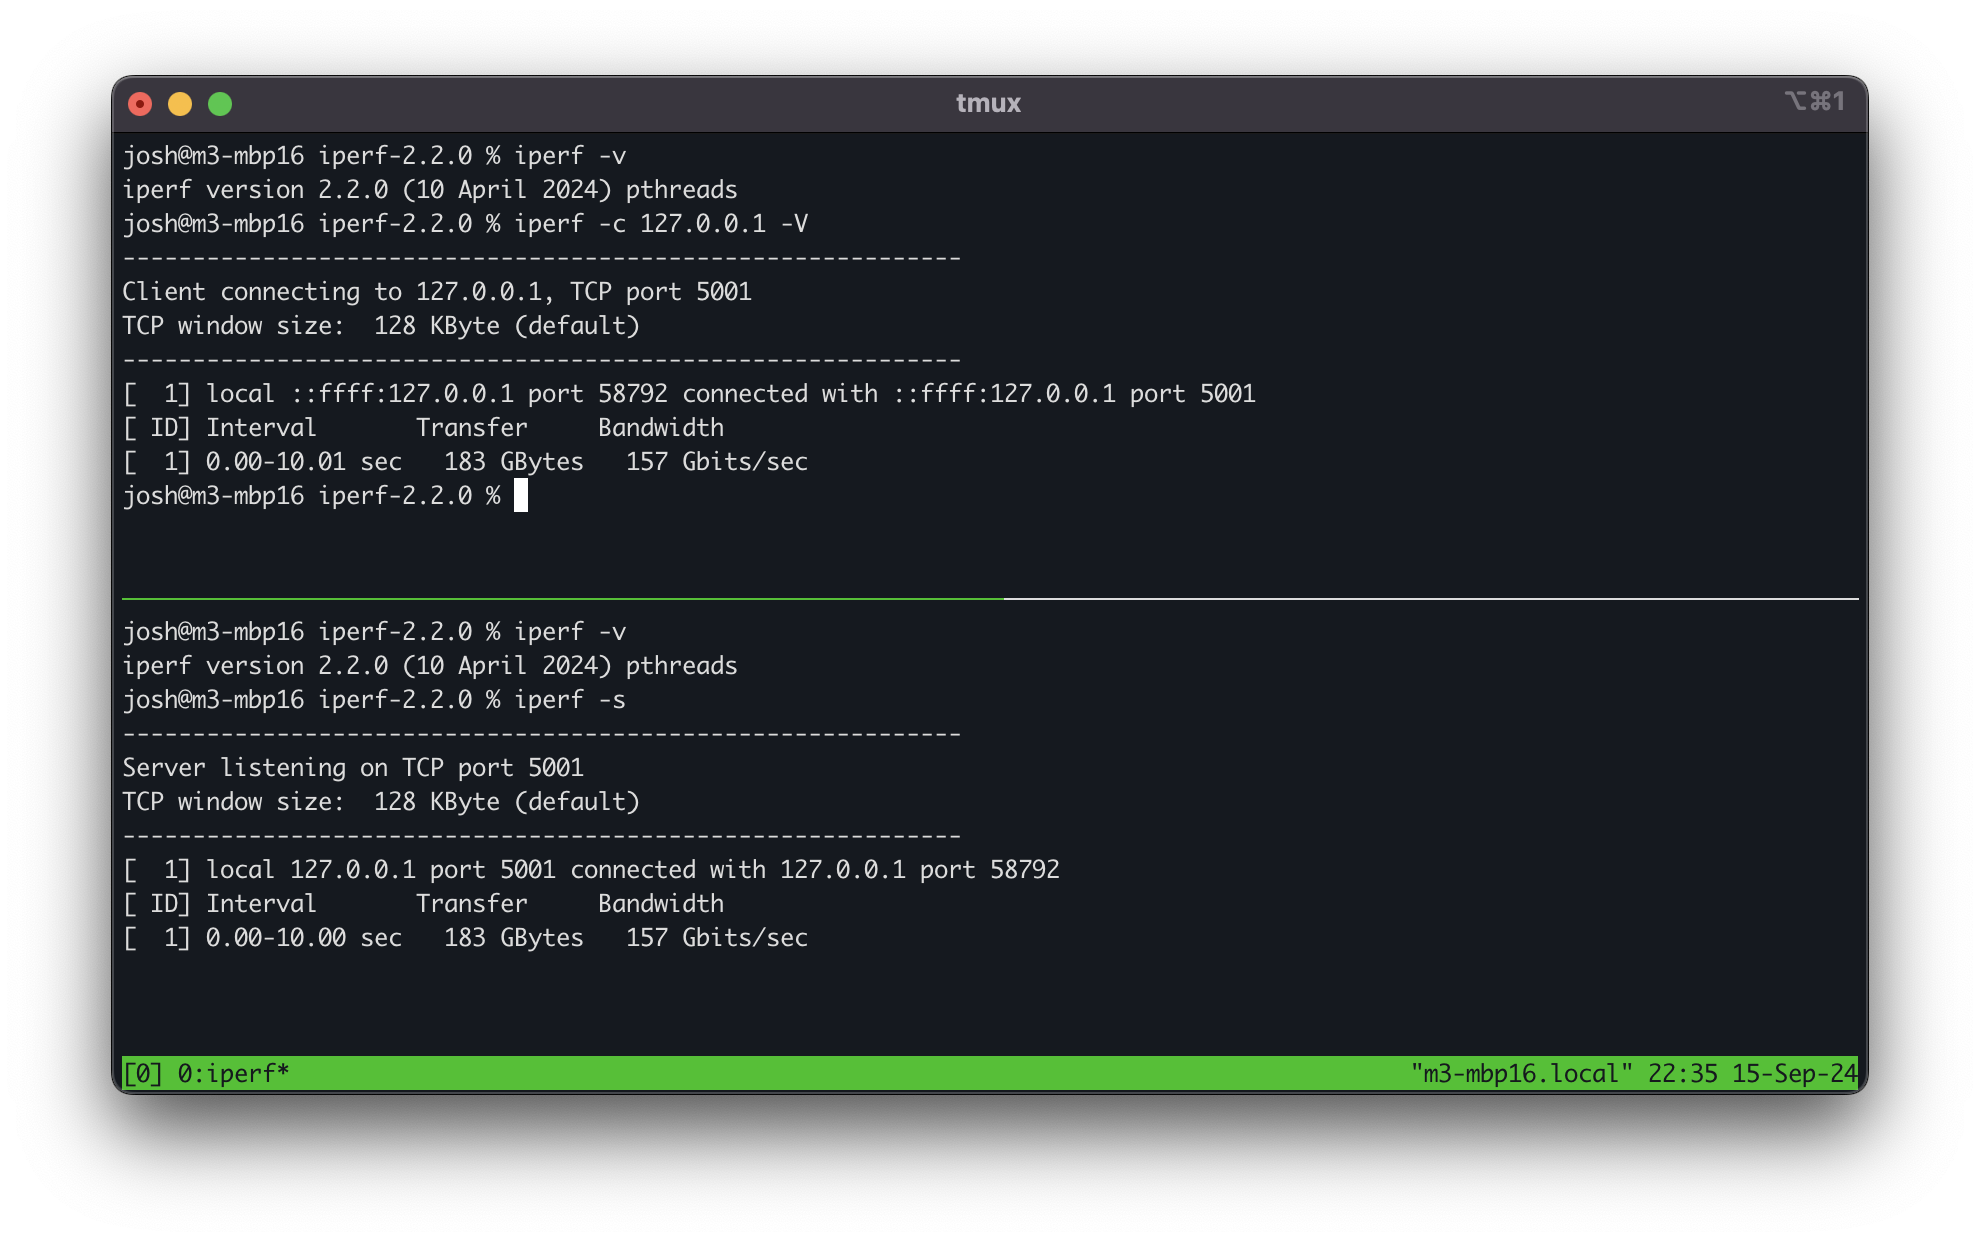
<p>MBP M3 (iperf2 v2.2.0):</p>

<p><img width="990" alt="image" src="/assets/images/2023-05-04-mbp-m3-iperf-v2.2.0.png" /></p>

<p>What do you think is being testing here when the server and client is on the same machine? And wow, the M3 is way faster than the M2. 125% increase!</p>

<h2 id="explore-the-arguments">Explore the arguments</h2>

<h3 id="quick-start-for-client-mode">Quick start for client mode</h3>

<div class="language-bash highlighter-rouge"><div class="highlight"><pre class="highlight"><code>iperf <span class="nt">-c</span> &lt;IP&gt; <span class="nt">-i</span> 1 <span class="nt">-w1M</span> <span class="nt">-P4</span> <span class="nt">-t</span> 60
</code></pre></div></div>

<p>Explanation:</p>

<ul>
  <li><code class="language-plaintext highlighter-rouge">-c &lt;IP&gt;</code>: This specifies that iperf should run in client mode (<code class="language-plaintext highlighter-rouge">-c</code>) and connect to the server at the specified IP address.</li>
  <li><code class="language-plaintext highlighter-rouge">-i 1</code>: This sets the interval (<code class="language-plaintext highlighter-rouge">-i</code>) for reporting the results. In this case, iperf will display intermediate results every (<code class="language-plaintext highlighter-rouge">1</code>) second.</li>
  <li><code class="language-plaintext highlighter-rouge">-w1M</code>: This sets the TCP window size (<code class="language-plaintext highlighter-rouge">-w</code>) for the test. Here, <code class="language-plaintext highlighter-rouge">1M</code> (1 megabyte) specifies the size of the TCP window. The window size controls how much data can be sent before receiving an acknowledgment.</li>
  <li><code class="language-plaintext highlighter-rouge">-P4</code>: This specifies the number of parallel (<code class="language-plaintext highlighter-rouge">-P</code>) client streams. With <code class="language-plaintext highlighter-rouge">-P4</code>, iperf will use 4 parallel streams to test the network. This can help in assessing the network performance under concurrent loads and can provide a more accurate measure of the overall bandwidth.</li>
  <li><code class="language-plaintext highlighter-rouge">-t 60</code>: This sets the time (<code class="language-plaintext highlighter-rouge">-t</code>) duration of the test. Here, <code class="language-plaintext highlighter-rouge">60</code> specifies that the test will run for 60 seconds.</li>
</ul>

<p>So, the command above will run an iperf client that connects to the server at the given IP address, using 4 parallel streams, with a 1 second reporting interval, a TCP window size of 1 megabyte, and a test duration of 60 seconds.</p>

<h3 id="usage-examples">Usage examples</h3>

<p>Basic Parameters</p>

<ul>
  <li><code class="language-plaintext highlighter-rouge">-s</code>: Run in server mode.</li>
  <li><code class="language-plaintext highlighter-rouge">-c &lt;host&gt;</code>: Run in client mode and connect to <host>.</host></li>
  <li><code class="language-plaintext highlighter-rouge">-p &lt;port&gt;</code>: Specify the port number to use (default is 5001).</li>
</ul>

<p>Test Duration and Interval</p>

<ul>
  <li><code class="language-plaintext highlighter-rouge">-t &lt;time&gt;</code>: Specify the time in seconds to run the test (default is 10 seconds).</li>
  <li>-<code class="language-plaintext highlighter-rouge">i &lt;interval&gt;</code>: Set the interval for reporting results (default is 1 second).</li>
</ul>

<p>Bandwidth and Transfer Control</p>

<ul>
  <li><code class="language-plaintext highlighter-rouge">-b &lt;bandwidth&gt;</code>: Set the bandwidth to use for the test. You can use suffixes like K, M, G (e.g., <code class="language-plaintext highlighter-rouge">-b 100M</code> for 100 Mbps).</li>
  <li><code class="language-plaintext highlighter-rouge">-n &lt;bytes&gt;</code>: Specify the amount of data to transfer (e.g., <code class="language-plaintext highlighter-rouge">-n 100M</code> for 100 MB or <code class="language-plaintext highlighter-rouge">-n 1000G</code> for 1 TB).</li>
</ul>

<p>Data Transfer Modes</p>

<ul>
  <li><code class="language-plaintext highlighter-rouge">-u</code>: Use UDP instead of TCP.</li>
  <li><code class="language-plaintext highlighter-rouge">-l &lt;length&gt;</code>: Set the length of the buffer to use for each packet (default is 8 KB).</li>
  <li><code class="language-plaintext highlighter-rouge">-f &lt;format&gt;</code>: Set the format for reporting bandwidth (k for kilobits/sec, m for megabits/sec, g for gigabits/sec).</li>
</ul>

<p>Additional Options</p>

<ul>
  <li><code class="language-plaintext highlighter-rouge">-V</code>: Enable verbose output.</li>
  <li><code class="language-plaintext highlighter-rouge">-R</code>: Reverse the direction of the test, so the server sends data and the client receives.</li>
  <li><code class="language-plaintext highlighter-rouge">-S &lt;tos&gt;</code>: Set the Type of Service (TOS) or Differentiated Services Code Point (DSCP) for the UDP packets.</li>
</ul>

<p>Client Options</p>

<ul>
  <li><code class="language-plaintext highlighter-rouge">-w &lt;window&gt;</code>: Set the TCP window size.</li>
  <li><code class="language-plaintext highlighter-rouge">-Z &lt;TCP compression algorithm&gt;</code>: Set the default congestion control algorithm (I tried reno, cubic, and bbr on the M3 and they all performed the same in the localhost test).</li>
</ul>

<p>For a complete list, take a look at the <a href="https://iperf2.sourceforge.io/iperf-manpage.html">iperf2 manpage</a>.</p>

<hr />

<p><a href="#top">↑ Top</a></p>]]></content><author><name>Josh Schmelzle</name></author><category term="tools" /><category term="tools" /><category term="speeds" /><summary type="html"><![CDATA[This post is about installing iperf2 from source on Mac computers with Apple silicon. The target machine used as an example is an Apple MacBook Pro 2023 with an Apple M2 Pro chip. I’ve also come back to this post in 2024 and done the same steps with an M3 MBP to install a newer version of iperf2.]]></summary></entry><entry><title type="html">International System of Units for Wi-Fi Professionals</title><link href="https://wizardfi.com/wifi/2023/04/02/SI-for-Wi-Fi-Professionals.html" rel="alternate" type="text/html" title="International System of Units for Wi-Fi Professionals" /><published>2023-04-02T16:00:00+00:00</published><updated>2023-04-02T16:00:00+00:00</updated><id>https://wizardfi.com/wifi/2023/04/02/SI-for-Wi-Fi-Professionals</id><content type="html" xml:base="https://wizardfi.com/wifi/2023/04/02/SI-for-Wi-Fi-Professionals.html"><![CDATA[<p>This post is about SI also known as International System of Units for Wi-Fi. The target audience is those who write about Wi-Fi. <a href="#top"></a></p>

<p><strong>Table of Contents</strong></p>

<ul id="markdown-toc">
  <li><a href="#why-should-i-care" id="markdown-toc-why-should-i-care">Why should I care?</a></li>
  <li><a href="#do-i-have-to-follow-these-rules" id="markdown-toc-do-i-have-to-follow-these-rules">Do I have to follow these rules?</a></li>
  <li><a href="#general-style" id="markdown-toc-general-style">General Style</a></li>
  <li><a href="#wi-fi" id="markdown-toc-wi-fi">Wi-Fi</a></li>
  <li><a href="#frequency-and-channel-bandwidth" id="markdown-toc-frequency-and-channel-bandwidth">Frequency and Channel Bandwidth</a></li>
  <li><a href="#power" id="markdown-toc-power">Power</a></li>
  <li><a href="#throughput" id="markdown-toc-throughput">Throughput</a></li>
  <li><a href="#resources-and-rationale" id="markdown-toc-resources-and-rationale">Resources and Rationale</a></li>
</ul>

<p>:cat:</p>

<h2 id="why-should-i-care">Why should I care?</h2>

<p>The International System of Units (SI) is a globally recognized system of measurement that provides a standardized way to measure and communicate various physical quantities such as length, mass, time, and electric current. Wi-Fi is a technology that uses radio waves to provide wireless network connectivity between devices.</p>

<p>Using the correct SI units is important for international communication and standardization. Wi-Fi is a global technology used by people around the world (<a href="https://www.wi-fi.org/beacon/chatwin-lansdowne/into-orbit-and-beyond-a-history-of-wi-fi-in-spaceflight">and in space!</a>), and having a common system of measurement ensures that everyone is using the same standards and terminology. This can help prevent confusion and promote efficient communication and collaboration across borders.</p>

<p>Overall, while understanding the SI units for Wi-Fi may not be essential for everyone, it can be a useful skill for those who create content for those who work in IT.</p>

<h2 id="do-i-have-to-follow-these-rules">Do I have to follow these rules?</h2>

<p>No, you don’t have to, but you <em>should</em>. Your writing style will be more correct if you follow these rules.</p>

<h2 id="general-style">General Style</h2>

<p>Rules:</p>

<ul>
  <li>Units are printed in lower-case letters unless they are derived from a proper name, in which
case the first letter is a capital letter. Like giga which the symbol is G where an example is 1 Gbps.</li>
  <li>The numerical value always precedes the unit symbol (unit of measurement) and a space is always used to separate the
unit from the number. Recommended to use a non-breaking space to separate the unit and number.</li>
  <li>The unit, if not included in SI, should follow branding guidelines (Wi-Fi for example) or commonly accepted conventions (dBm for example).</li>
</ul>

<h2 id="wi-fi">Wi-Fi</h2>

<p>Correct:</p>

<ul>
  <li>Wi-Fi</li>
  <li>Wi-Fi 4</li>
  <li>Wi-Fi 5</li>
  <li>Wi-Fi 6</li>
  <li>Wi-Fi 6E</li>
  <li>Wi-Fi 7</li>
  <li>Wi-Fi 8</li>
</ul>

<p>Wrong:</p>

<ul>
  <li>wifi</li>
  <li>WIFI</li>
  <li>WiFi</li>
  <li>WiFI</li>
  <li>wifi 1</li>
  <li>wIFi 2</li>
  <li>Wi-Fi 3</li>
  <li>wifi6</li>
  <li>WiFi6</li>
  <li>wifi6e</li>
  <li>wi-fi</li>
  <li>Wi-FI</li>
  <li>Wi-Fi 6e</li>
  <li>Wi-Fi6e</li>
  <li>wifi7</li>
  <li>WiFi7</li>
  <li>wifi8</li>
</ul>

<h2 id="frequency-and-channel-bandwidth">Frequency and Channel Bandwidth</h2>

<p>Correct:</p>

<ul>
  <li>1 Hz</li>
  <li>20 MHz</li>
  <li>40 MHz</li>
  <li>6 GHz</li>
</ul>

<p>Wrong:</p>

<ul>
  <li>1hz</li>
  <li>1 hz</li>
  <li>20mhz</li>
  <li>40MHZ</li>
  <li>40 MHZ</li>
  <li>6ghz</li>
  <li>6Ghz</li>
  <li>6GHz</li>
</ul>

<h2 id="power">Power</h2>

<p>Correct:</p>

<ul>
  <li>1 W</li>
</ul>

<p>Wrong:</p>

<ul>
  <li>1w</li>
</ul>

<h2 id="throughput">Throughput</h2>

<p>Correct:</p>

<ul>
  <li>10 Mbps</li>
  <li>20 Gbps</li>
</ul>

<p>Wrong:</p>

<ul>
  <li>10mbps</li>
  <li>10 mbps</li>
  <li>10 MBPS</li>
  <li>20GBPS</li>
</ul>

<h2 id="resources-and-rationale">Resources and Rationale</h2>

<p>Check out these links for further reading to understand the rationale behind this post.</p>

<ul>
  <li>International System of Units and SI Brochure: <a href="https://en.wikipedia.org/wiki/International_System_of_Units_">https://en.wikipedia.org/wiki/International_System_of_Units</a></li>
  <li>NIST: <a href="https://physics.nist.gov/cuu/Units/checklist.html">https://physics.nist.gov/cuu/Units/checklist.html</a></li>
  <li>dBm: <a href="https://en.wikipedia.org/wiki/DBm">https://en.wikipedia.org/wiki/DBm</a></li>
</ul>

<hr />

<p><strong>Thanks</strong> to Colin Vallance for reading drafts of this.</p>

<p><a href="#top">↑ Top</a></p>]]></content><author><name>Josh Schmelzle</name></author><category term="wifi" /><category term="style" /><category term="writing" /><summary type="html"><![CDATA[This post is about SI also known as International System of Units for Wi-Fi. The target audience is those who write about Wi-Fi.]]></summary></entry><entry><title type="html">Manually Forcing macOS Connection to Target AP by Channel Locking</title><link href="https://wizardfi.com/wifi/2023/03/14/manually-forcing-macos-to-target-AP.html" rel="alternate" type="text/html" title="Manually Forcing macOS Connection to Target AP by Channel Locking" /><published>2023-03-14T23:21:59+00:00</published><updated>2023-03-14T23:21:59+00:00</updated><id>https://wizardfi.com/wifi/2023/03/14/manually-forcing-macos-to-target-AP</id><content type="html" xml:base="https://wizardfi.com/wifi/2023/03/14/manually-forcing-macos-to-target-AP.html"><![CDATA[<p>This is a short post about how to direct the internal NIC on a MacBook to connect to a particular AP BSSID through setting the target channel.</p>

<ul id="markdown-toc">
  <li><a href="#symlinking-the-airport-utility" id="markdown-toc-symlinking-the-airport-utility">Symlinking the airport utility</a></li>
  <li><a href="#airport-channel-locking-procedure" id="markdown-toc-airport-channel-locking-procedure">airport channel locking procedure</a></li>
</ul>

<p>:metal:</p>

<h2 id="symlinking-the-airport-utility">Symlinking the airport utility</h2>

<p>First things first. Let’s make it easy to find the hidden but included airport utility by creating a symbolic link to a directory on the PATH environment variable.</p>

<p>Symlink the airport utility to <code class="language-plaintext highlighter-rouge">/usr/sbin</code>.</p>

<div class="language-bash highlighter-rouge"><div class="highlight"><pre class="highlight"><code><span class="nb">sudo ln</span> <span class="nt">-s</span> /System/Library/PrivateFrameworks/Apple80211.framework/Versions/Current/Resources/airport /usr/sbin/airport
</code></pre></div></div>

<h2 id="airport-channel-locking-procedure">airport channel locking procedure</h2>

<ol>
  <li>
    <p>Disassociate</p>
  </li>
  <li>
    <p>Set target channel with the airport utility</p>

    <div class="language-bash highlighter-rouge"><div class="highlight"><pre class="highlight"><code><span class="nb">sudo </span>airport <span class="nt">--channel</span><span class="o">=</span>120
</code></pre></div>    </div>

    <p>Confirm with-</p>

    <div class="language-bash highlighter-rouge"><div class="highlight"><pre class="highlight"><code>airport <span class="nt">-I</span>
</code></pre></div>    </div>
  </li>
  <li>
    <p>Associate</p>
  </li>
</ol>

<p>Fingers crossed the Wi-Fi NIC connects to the target channel. I’ve tested with some success on macOS Ventura 13.2.1 on an Intel-based MacBook Pro. Let me know if it works or doesn’t.</p>]]></content><author><name>Josh Schmelzle</name></author><category term="wifi" /><category term="wireless" /><category term="macos" /><summary type="html"><![CDATA[This is a short post about how to direct the internal NIC on a MacBook to connect to a particular AP BSSID through setting the target channel.]]></summary></entry><entry><title type="html">What I Learned Building a Wi-Fi Scanner</title><link href="https://wizardfi.com/wifi/2020/10/03/what-i-learned-building-a-wifi-scanner.html" rel="alternate" type="text/html" title="What I Learned Building a Wi-Fi Scanner" /><published>2020-10-03T23:18:00+00:00</published><updated>2020-10-03T23:18:00+00:00</updated><id>https://wizardfi.com/wifi/2020/10/03/what-i-learned-building-a-wifi-scanner</id><content type="html" xml:base="https://wizardfi.com/wifi/2020/10/03/what-i-learned-building-a-wifi-scanner.html"><![CDATA[<p><img src="/assets/images/2020-10-03-lswifi-min.png" alt="" /> <a href="#top"></a></p>

<p>After a few years of development, I released a lightweight Wi-Fi scanner for the Windows<sup id="fnref:microsoftwindows" role="doc-noteref"><a href="#fn:microsoftwindows" class="footnote" rel="footnote">1</a></sup> command-line interface.</p>

<p>It provides some information about nearby networks that built-in tools do not provide. This includes RSSI, dissection of some information elements, and more.</p>

<h2 id="sharing-knowledge-is-important">Sharing Knowledge Is Important</h2>

<p>Many have graciously passed on knowledge to me. This is the primary reason why I decided to share this project with others and make the source code available. You can find the code on my personal GitHub <a href="https://github.com/joshschmelzle/lswifi">joshschmelzle/lswifi</a> account.</p>

<h2 id="naming-things-is-hard">Naming Things Is Hard</h2>

<p>I called it <code class="language-plaintext highlighter-rouge">lswifi</code> because all the other clever names on <a href="https://pypi.org/">Python Package Index (PyPI)</a> were already taken. This was probably the only thing I regret. Not properly reserving the names that I wanted when I discovered they were available. I even rented a domain for a year which expired before I released this project. Oops.</p>

<h2 id="how-to-dissect-80211-information-elements">How to Dissect 802.11 Information Elements</h2>

<p>This project has taught me a lot about different information elements found in 802.11 beacon and probe response frames across different vendors.</p>

<p>From the vendor attributes containing AP names, to the RSNE containing security information, to WMM and EDCA values.</p>

<p>Parsing out these information elements with code was an incredibly valuable learning experience.</p>

<h2 id="python-packaging">Python Packaging</h2>

<p>I learned how to <a href="https://packaging.python.org/">package scripts</a> into sharable tools. This was absolutely required to get beyond code that only runs on my machine.</p>

<p>I started this project back when <a href="https://kenreitz.org/">Ken Reitz</a> was the primary maintainer of <a href="https://github.com/psf/requests">requests</a> and adapted my packaging approach based on his. Requests is now maintained by the Python Software Foundation (PSF).</p>

<p>I uploaded <code class="language-plaintext highlighter-rouge">lswifi</code> to PyPI. This means you can download it with <code class="language-plaintext highlighter-rouge">pip install lswifi</code>.</p>

<p>The console scripts entry point is named <code class="language-plaintext highlighter-rouge">lswifi</code>. On install a command-line wrapper is created around the entry point. By default when you run <code class="language-plaintext highlighter-rouge">lswifi</code> it will respond with a list of nearby networks.</p>

<div class="language-bash highlighter-rouge"><div class="highlight"><pre class="highlight"><code>C:<span class="se">\U</span>sers<span class="se">\j</span>osh&gt;where.exe lswifi
C:<span class="se">\U</span>sers<span class="se">\j</span>osh<span class="se">\A</span>ppData<span class="se">\L</span>ocal<span class="se">\P</span>rograms<span class="se">\P</span>ython<span class="se">\P</span>ython38<span class="se">\S</span>cripts<span class="se">\l</span>swifi.exe
</code></pre></div></div>

<p>After install, you should be able to type <code class="language-plaintext highlighter-rouge">lswifi</code> and hit enter after installing. If that doesn’t work. Likely the Python scripts directory is not in the PATH environment variable.</p>

<h2 id="how-to-decide-what-to-support">How to Decide What to Support</h2>

<p><code class="language-plaintext highlighter-rouge">lswifi</code> is built with Python and requires Python 3.7 or higher. I want to be able to use some of the features in 3.7 like <a href="https://docs.python.org/3.7/library/dataclasses.html">dataclasses</a> and improvements to <a href="https://docs.python.org/3/library/index.html">stdlib</a> packages like asyncio.</p>

<p>I will only support Windows 10 even if it might work on older versions of Windows. I no longer have access to anything running an older version of Windows. Nor do I wish to.</p>

<p>Now and in the foreseeable future, <code class="language-plaintext highlighter-rouge">lswifi</code> is a CLI tool only. I do not intend to create a GUI for it. But I may add a background service that provides notifications on certain events like connection and roaming events.</p>

<p>I get to pick and choose what to support because my time is valuable. Every minute I spend working on <code class="language-plaintext highlighter-rouge">lswifi</code> is a minute taken away from spending time with my family. I am also not compensated for this work.</p>

<h2 id="improved-knowledge-of-a-programming-language">Improved Knowledge of a Programming Language</h2>

<p>I picked Python. And unfortunately this required creating a wrapper around Native Wifi wlanapi.h. This is because the Native Wifi API is designed for C/C++ developers. This project has taught me a lot about Python. I currently have no third party dependencies on anything outside of the standard library.</p>

<h2 id="ctypes-required">ctypes Required</h2>

<p>To interface with the Native Wifi library using Python, you must write wrapper code around the wlanapi.h.</p>

<p>This is painful and not for the faint hearted. Along with reading the official <a href="https://docs.python.org/3/library/ctypes.html">ctypes</a> documentation, I did a lot of googling to figure out how to write wrapper code. The folks I pinged about it sent me towards articles which I had already looked at.</p>

<p>I did find some similar Python wrapper libraries around wlanapi.h, but they had problems. I ended up re-writing anything I found to adapt it to my project.</p>

<p>I wouldn’t have been able to do this without Microsoft’s <a href="https://docs.microsoft.com/en-us/windows/win32/nativewifi/portal">Native Wifi</a> documentation. <a href="https://www.helge-keck.com/">Helge Magnus Keck</a> was also kind to share bits and pieces of knowledge with me. Thank you Helge.</p>

<h2 id="limitations-of-the-native-wifi-api">Limitations of the Native Wifi API</h2>

<p>When you ask for scan results from the Native Wifi wlanapi.h, you have no control over certain things.</p>

<p>No control over what channels get scanned. That is up to the driver, per scan request. I often see mine skip DFS channels where I know APs are. The best solution I have come up is to run <code class="language-plaintext highlighter-rouge">lswifi</code> a few more times to get more scan results.</p>

<p>We have no control over how long the dwell time is on a certain channel. The wlanapi expects the driver to complete and return scan results with-in 4 seconds, but sometimes it will respond faster. The approach we use is a callback to detect when the results available. Once available, we ask for the results and get a list of networks and their fixed and tagged parameters (information elements or IEs).</p>

<p>Scan results can contain a  beacons, probe responses, or both of those merged for a particular network. This means:</p>

<ul>
  <li>Some results may have IEs from only the probe response</li>
  <li>Some results may have IEs from only the beacon</li>
  <li>Some results provided back are from cached results</li>
  <li>Some results may mix the IEs for the beacon and probe response for a particular network</li>
</ul>

<p>This is why some results have AP names in them and some don’t. AP names are in beacons, not probe responses. So the application layer must cache those types of results in order to display them consistently in the output.</p>

<div class="language-plaintext highlighter-rouge"><div class="highlight"><pre class="highlight"><code>C:\Users\josh&gt;lswifi --ap-names -include corp
display filter sensitivity -82; displaying 4 of 24 BSSIDs detected in scan results:
-==~+=~~=+++=-  -~~~=~=~=~+~+~~+-  -=~+++=+=++~====++-  -~==-  -~-  -=~~+~-  --  -=~++===~=~+-  -===~+++==~-
         ESSID  BSSID              AP NAME              RSSI   PHY  CHANNEL  SS  AMENDMENTS     AP UPTIME
[Network Name]                                          [dBm]  .11  [#@MHz]  #   [802.11]       [approx.]
-+~~=~~=~=~++-  -++~~=~=~++=+~+=-  -~~+~~+~~=++=~+~=+-  -++=-  -~-  -~=~=~-  --  -~+~~=====+~-  -++~++++~~~-
     corp-fast  b4:5d:50:1a:d3:91  Josh-205H            -73    ac    52@20   2   d/e/h/i/k/r/v  00d 1:51:58
     corp-data  b4:5d:50:1a:d3:90  Josh-205H            -75    ac    52@20   2   d/e/h/i/k/v    00d 1:51:58
     corp-fast  a8:bd:27:33:44:f1                       -77    ac    64@40-  4   d/e/h/i/k/r/v  03d 15:48:23
     corp-data  a8:bd:27:33:44:f0  Josh-AP324           -77    ac    64@40-  4   d/e/h/i/v      03d 15:48:23
</code></pre></div></div>

<p>We also have no idea if RSSI values are averaged across multiple frames. This could be problematic depending on what you’re trying to do with the responses. This means we may not want to use this sort of data for a passive survey. Michael Berg (<a href="https://www.tamos.com/">TamoSoft</a>) and Mikko Lauronen (<a href="https://www.ekahau.com/">Ekahau</a>) explained on a recent Twitter thread that when doing a passive survey, the most accurate way to get survey data is to do a packet capture gathering beacons without keeping the packets. Most professional survey tools take an active packet capture during a passive survey and do not save the packets.</p>

<p>With that said, responses from the Native Wifi API still have purpose. This gives us insight into what networks are seen from and available from the clients perspective. We can do a simple discovery scan for nearby networks and display the results. That is what <code class="language-plaintext highlighter-rouge">lswifi</code> does.</p>

<p>Pick the right tool for the job at hand.</p>

<h2 id="an-ide-may-be-needed-as-your-codebase-grows">An IDE May Be Needed as Your Codebase Grows</h2>

<p>When the codebase gets large, it is worth considering using an <a href="https://en.wikipedia.org/wiki/Integrated_development_environment">Integrated Development Environment (IDE)</a>. I did much of the development using <a href="https://www.jetbrains.com/pycharm/">PyCharm</a>. This is not required though. <a href="https://code.visualstudio.com/">VS Code</a> is a good choice for those looking to start something today. <a href="https://www.sublimetext.com/3">Sublime Text 3</a> is also another strong choice. <a href="https://realpython.com/">Real Python</a> has a great article on <a href="https://realpython.com/setting-up-sublime-text-3-for-full-stack-python-development/">ST3 for full stack Python development</a>. If you do any Python work on <a href="https://en.wikipedia.org/wiki/Single-board_computer">SBCs</a>, it is critical to learn <a href="https://www.vim.org/">Vim</a>. If you absolutely do not want to learn Vim, you can now do <a href="https://code.visualstudio.com/docs/remote/ssh">remote development using VS Code</a>. I have used each of the above to write Python code.</p>

<h2 id="the-path-is-not-straight">The Path Is Not Straight</h2>

<p>It took me many hours of trial and error. The path was not straight forward. I’ve asked many people questions to help develop certain things. I’ve had many personal ups and downs during development. I am very grateful for those who have shared their positivity with me.</p>

<h2 id="perfection-is-a-blocker">Perfection Is a Blocker</h2>

<p>There are many things about <code class="language-plaintext highlighter-rouge">lswifi</code> that need improved. Let’s be honest: all code is garbage. There is always a better way to do what I am doing, but I can’t let perfection stop me. Perfection is the enemy of done. With that said, there is much work left to do on it.</p>

<h2 id="i-built-lswifi-for-me">I Built lswifi for Me</h2>

<p>I built <code class="language-plaintext highlighter-rouge">lswifi</code> for me. I hope if others try it, they find it useful.</p>

<p>Got questions? Reach out. I appreciate constructive comments and feedback!</p>

<p>:metal:</p>

<h2 id="changelog">Changelog</h2>

<ul>
  <li>2020/10/04: added a few more sections, formatting, clarifications, and fixed some minor spelling errors</li>
</ul>

<p><a href="#top">↑ Top</a></p>

<hr />

<div class="footnotes" role="doc-endnotes">
  <ol>
    <li id="fn:microsoftwindows" role="doc-endnote">
      <p>Microsoft Windows for those who subtweet. <a href="#fnref:microsoftwindows" class="reversefootnote" role="doc-backlink">&#8617;</a></p>
    </li>
  </ol>
</div>]]></content><author><name>Josh Schmelzle</name></author><category term="wifi" /><summary type="html"><![CDATA[]]></summary></entry><entry><title type="html">MAC Randomization</title><link href="https://wizardfi.com/wifi/2020/10/02/mac-randomization.html" rel="alternate" type="text/html" title="MAC Randomization" /><published>2020-10-02T22:00:00+00:00</published><updated>2020-10-02T22:00:00+00:00</updated><id>https://wizardfi.com/wifi/2020/10/02/mac-randomization</id><content type="html" xml:base="https://wizardfi.com/wifi/2020/10/02/mac-randomization.html"><![CDATA[<p><a href="#top"></a></p>

<p>This post is about MAC Addresses and dissecting their common randomization format.</p>

<ul id="markdown-toc">
  <li><a href="#what-is-a-mac-address" id="markdown-toc-what-is-a-mac-address">What is a MAC Address</a></li>
  <li><a href="#governance-and-definition" id="markdown-toc-governance-and-definition">Governance and Definition</a></li>
  <li><a href="#representation-of-a-mac-address" id="markdown-toc-representation-of-a-mac-address">Representation of a MAC Address</a></li>
  <li><a href="#universal-mac-addresses" id="markdown-toc-universal-mac-addresses">Universal MAC Addresses</a></li>
  <li><a href="#mac-randomization" id="markdown-toc-mac-randomization">MAC Randomization</a></li>
  <li><a href="#local-mac-addresses" id="markdown-toc-local-mac-addresses">Local MAC Addresses</a></li>
  <li><a href="#structure-of-local-mac-addresses" id="markdown-toc-structure-of-local-mac-addresses">Structure of Local MAC Addresses</a></li>
  <li><a href="#detection-using-python" id="markdown-toc-detection-using-python">Detection Using Python</a>    <ul>
      <li><a href="#example-function" id="markdown-toc-example-function">Example Function</a></li>
      <li><a href="#example-regular-expression" id="markdown-toc-example-regular-expression">Example Regular Expression</a></li>
    </ul>
  </li>
  <li><a href="#changelog" id="markdown-toc-changelog">Changelog</a></li>
</ul>

<p>:metal:</p>

<h2 id="what-is-a-mac-address">What is a MAC Address</h2>

<p>A MAC address<sup id="fnref:macaddress" role="doc-noteref"><a href="#fn:macaddress" class="footnote" rel="footnote">1</a></sup> is an identifier for a network interface. This is sometimes referred to as a layer 2 address<sup id="fnref:osimodel" role="doc-noteref"><a href="#fn:osimodel" class="footnote" rel="footnote">2</a></sup> or physical address.</p>

<p>Note some networked devices may have multiple interfaces. This means a device could be identified by multiple MAC addresses.</p>

<p>There are different types of MAC addresses. Some are universally unique. Some are locally assigned (not universally unique). Some kinds have different lengths.</p>

<p>This post will only cover at the surface unicast 48-bit MAC addresses (with a 24-bit OUI), Universally Administered (UAA), and Locally Administered (LAA).</p>

<h2 id="governance-and-definition">Governance and Definition</h2>

<p>There are two standards bodies involved in MAC Addresses. The concept and definition is a recognized international standard.</p>

<p>The International Organization for Standardization (ISO) body defines MAC Address definition and representation. ISO legitimizes the format internationally. The original standard is ISO/IEC 10039 published first in 1991, but I was unable to find an available copy to review for this post.</p>

<p>The Institute of Electrical and Electronics Engineers (IEEE) is the authority, assigner, and maintainer of unique identifiers.</p>

<h2 id="representation-of-a-mac-address">Representation of a MAC Address</h2>

<p>A binary<sup id="fnref:bigendian" role="doc-noteref"><a href="#fn:bigendian" class="footnote" rel="footnote">3</a></sup> representation of a 48-bit MAC address is 6 octets of binary digits (bits):</p>

<table>
  <thead>
    <tr>
      <th>octet</th>
      <th>0</th>
      <th>1</th>
      <th>2</th>
      <th>3</th>
      <th>4</th>
      <th>5</th>
    </tr>
  </thead>
  <tbody>
    <tr>
      <td> </td>
      <td>01110000</td>
      <td>10000001</td>
      <td>11101011</td>
      <td>11001010</td>
      <td>10101001</td>
      <td>10110001</td>
    </tr>
  </tbody>
</table>

<p>The human readable format of a 48-bit MAC address is represented by 12 hexadecimal (hex) characters. There are 16 characters in a single hex digit which represent values <code class="language-plaintext highlighter-rouge">0 to 9</code> and <code class="language-plaintext highlighter-rouge">a to f</code>. This means hex is known as a base 16 numerical system. Each octet is represented by 2 hexadecimal characters.</p>

<p>A 48-bit MAC address represented in hexadecimal:</p>

<ul>
  <li><code class="language-plaintext highlighter-rouge">70:81:eb:ca:a9:b1</code></li>
</ul>

<p>You might see hexadecimal representation in a few different formats. Here are some common ones:</p>

<ul>
  <li><code class="language-plaintext highlighter-rouge">70:81:eb:ca:a9:b1</code> - colon delimiter</li>
  <li><code class="language-plaintext highlighter-rouge">70-81-eb-ca-a9-b1</code> - hyphen delimiter</li>
  <li><code class="language-plaintext highlighter-rouge">7081.ebca.a9b1</code> - dot delimiter in groups of 4 hex digits</li>
  <li><code class="language-plaintext highlighter-rouge">7081ebcaa9b1</code> - no delimiter</li>
</ul>

<p>Stacked binary and hexadecimal representation:</p>

<table>
<tr>
	<th>octet</th>
	<th colspan="2">0</th>
	<th colspan="2">1</th>
	<th colspan="2">2</th>
	<th colspan="2">3</th>
	<th colspan="2">4</th>
	<th colspan="2">5</th>
</tr>
<tr>
	<td><b>hex</b></td>
	<td>7</td>
    <td>0</td>
	<td>8</td>
    <td>1</td>
	<td>e</td>
    <td>b</td>
	<td>c</td>
    <td>a</td>
	<td>a</td>
    <td>9</td>
	<td>b</td>
    <td>1</td>
</tr>
<tr>
	<td><b>binary</b></td>
	<td>0111</td>
    <td>0000</td>
	<td>1000</td>
    <td>0001</td>
	<td>1110</td>
    <td>1011</td>
	<td>1100</td>
    <td>1010</td>
	<td>1010</td>
    <td>1001</td>
	<td>1011</td>
    <td>0001</td>
</tr>
</table>

<h2 id="universal-mac-addresses">Universal MAC Addresses</h2>

<p>Companies like Apple, Google, Microsoft, etc. request and purchase blocks of identifiers (MAC addresses) from the IEEE. The IEEE will assign them a 24-bit Organizationally Unique Identifier (OUI). The remaining bits are assigned however the company wishes given uniqueness is maintained.</p>

<p>When a network interface is using the MAC address assigned by the company, this is known as the burned-in address. This particular identifier is known as a Universal MAC Address.</p>

<p>Example representation of an OUI:</p>

<table>
<tr>
	<th>octet</th>
	<th colspan="2">0</th>
	<th colspan="2">1</th>
	<th colspan="2">2</th>
</tr>
<tr>
	<td></td>
	<td rowspan="1" colspan="6">24-bit OUI</td>
</tr>
<tr>
	<td><b>hex</b></td>
	<td>7</td>
    <td>0</td>
	<td>8</td>
    <td>1</td>
	<td>e</td>
    <td>b</td>
</tr>
<tr>
	<td><b>binary</b></td>
	<td>0111</td>
    <td>0000</td>
	<td>1000</td>
    <td>0001</td>
	<td>1110</td>
    <td>1011</td>
</tr>
</table>

<p><code class="language-plaintext highlighter-rouge">70:81:eb</code> is an OUI assigned to Apple by the IEEE. You can see for yourself by plugging in the hex representation into an OUI lookup tool<sup id="fnref:ouilookup" role="doc-noteref"><a href="#fn:ouilookup" class="footnote" rel="footnote">4</a></sup>.</p>

<h2 id="mac-randomization">MAC Randomization</h2>

<p>MAC randomization is not a new concept. It has been used for years by certain clients to randomize the address sent in probe requests. When associated, the client would send the real MAC address.</p>

<p>Many client manufacturers now enable MAC randomization by default. For both the probe request and association. This includes <a href="https://support.apple.com/en-us/HT211227">iOS 14</a>, <a href="https://source.android.com/devices/tech/connect/wifi-mac-randomization">Android 10</a>, and <a href="https://support.microsoft.com/en-us/help/4027925/windows-how-and-why-to-use-random-hardware-addresses">Windows 10</a>. <a href="https://www.commscope.com/blog/2020/so-whats-the-big-deal-about-mac-randomization">Jim Palmer has a great article on this</a>.</p>

<p>This means the MAC randomization feature changes the burned-in address to a randomized MAC address. The idea of MAC randomization is to help protect end users from tracking or profiling across Wi-Fi networks. It is a privacy feature for consumers.</p>

<p>The common private MAC address format leveraged is technically known as the Locally Administered Address (LAA) format.</p>

<h2 id="local-mac-addresses">Local MAC Addresses</h2>

<p>MAC address can either be universally or locally assigned. We already covered that universal addresses are assigned by the manufacturer. A locally administered address is not assigned from an IEEE block of MAC addresses.</p>

<p>We can determine whether a MAC address is universal or local by looking at a specific bit in the first octet. The distinguishment is by setting the second least significant bit (LSB) of the first octet.</p>

<p>If the second LSB is set (<code class="language-plaintext highlighter-rouge">1</code>), the address is administered locally. If the second LSB is unset (<code class="language-plaintext highlighter-rouge">0</code>), the address is administered universally:</p>

<ul>
  <li><code class="language-plaintext highlighter-rouge">0</code>: intended to be globally unique (OUI enforced)</li>
  <li><code class="language-plaintext highlighter-rouge">1</code>: locally administered</li>
</ul>

<p>For a local example, the first octet of <code class="language-plaintext highlighter-rouge">d6:70:b6:a2:b8:8a</code> contains <code class="language-plaintext highlighter-rouge">d6</code> (2 hex digits). The binary representation of the first octet is <code class="language-plaintext highlighter-rouge">11010110</code>. Where bits 7-4 = <code class="language-plaintext highlighter-rouge">1101</code> or hex digit <code class="language-plaintext highlighter-rouge">d</code>, and then bits 3-0 = <code class="language-plaintext highlighter-rouge">0110</code> or hex digit <code class="language-plaintext highlighter-rouge">6</code>. The second LSB is set. This is a local MAC address.</p>

<p>The second LSB is 1. It’s bit position 1 in the table below (the value two from the far right).</p>

<table>
<tr>
	<th>bit position</th>
	<th>7</th>
	<th>6</th>
	<th>5</th>
	<th>4</th>
	<th>3</th>
	<th>2</th>
	<th>1</th>
	<th>0</th>
</tr>
<tr>
	<td></td>
    <td>1</td>
	<td>1</td>
    <td>0</td>
	<td>1</td>
    <td>0</td>
    <td>1</td>
    <td bgcolor="#F08080">1</td>
    <td>0</td>
</tr>
<tr>
	<td></td>
    <td>MSB</td>
	<td></td>
    <td></td>
	<td></td>
    <td></td>
    <td></td>
    <td></td>
    <td>LSB</td>
</tr>
</table>

<p>For a universal example, the first octet of <code class="language-plaintext highlighter-rouge">70:81:eb:ca:a9:b1</code> contains <code class="language-plaintext highlighter-rouge">70</code> (2 hex digits). The binary representation of the first octet is <code class="language-plaintext highlighter-rouge">01110000</code>. Where bits 7-4 = <code class="language-plaintext highlighter-rouge">0111</code> or hex digit <code class="language-plaintext highlighter-rouge">7</code>, and then bits 3-0 = <code class="language-plaintext highlighter-rouge">0000</code> or hex digit <code class="language-plaintext highlighter-rouge">0</code>. The second LSB is unset. This is a universal MAC address.</p>

<p>The second LSB is 0. It is represented by bit position 1 in the table below.</p>

<table>
<tr>
	<th>bit position</th>
	<th>7</th>
	<th>6</th>
	<th>5</th>
	<th>4</th>
	<th>3</th>
	<th>2</th>
	<th>1</th>
	<th>0</th>
</tr>
<tr>
	<td></td>
    <td>0</td>
	<td>1</td>
    <td>1</td>
	<td>1</td>
    <td>0</td>
    <td>0</td>
    <td bgcolor="#F08080">0</td>
    <td>0</td>
</tr>
<tr>
	<td></td>
    <td>MSB</td>
	<td></td>
    <td></td>
	<td></td>
    <td></td>
    <td></td>
    <td></td>
    <td>LSB</td>
</tr>
</table>

<h2 id="structure-of-local-mac-addresses">Structure of Local MAC Addresses</h2>

<p>We can now look at the 2nd LSB of the first octet of a MAC address to determine if it is following the MAC randomization format.</p>

<p>Here are the possible unicast values for the 2nd digit of a MAC address:</p>

<table>
<tr>
	<th>bit position</th>
	<th>7-4</th>
	<th>3</th>
	<th>2</th>
	<th>1</th>
	<th>0</th>
	<th>hex</th>
	<th>type</th>
</tr>
<tr>
	<td></td>
    <td>....</td>
	<td>0</td>
    <td>0</td>
	<td bgcolor="#F08080">0</td>
    <td>0</td>
    <td>x0</td>
    <td>universal</td>
</tr>
<tr>
	<td></td>
    <td>....</td>
	<td>0</td>
    <td>1</td>
	<td bgcolor="#F08080">0</td>
    <td>0</td>
    <td>x4</td>
    <td>universal</td>
</tr>
<tr>
	<td></td>
    <td>....</td>
	<td>1</td>
    <td>0</td>
	<td bgcolor="#F08080">0</td>
    <td>0</td>
    <td>x8</td>
    <td>universal</td>
</tr>
<tr>
	<td></td>
    <td>....</td>
	<td>1</td>
    <td>1</td>
	<td bgcolor="#F08080">0</td>
    <td>0</td>
    <td>xC</td>
    <td>universal</td>
</tr>
<tr>
	<td></td>
    <td>....</td>
	<td>0</td>
    <td>0</td>
	<td bgcolor="#F08080">1</td>
    <td>0</td>
    <td>x2</td>
    <td>local</td>
</tr>
<tr>
	<td></td>
    <td>....</td>
	<td>0</td>
    <td>1</td>
	<td bgcolor="#F08080">1</td>
    <td>0</td>
    <td>x6</td>
    <td>local</td>
</tr>
<tr>
	<td></td>
    <td>....</td>
	<td>1</td>
    <td>0</td>
	<td bgcolor="#F08080">1</td>
    <td>0</td>
    <td>xA</td>
    <td>local</td>
</tr>
<tr>
	<td></td>
    <td>....</td>
	<td>1</td>
    <td>1</td>
	<td bgcolor="#F08080">1</td>
    <td>0</td>
    <td>xE</td>
    <td>local</td>
</tr>
<tr>
	<td></td>
    <td>MSB</td>
	<td></td>
    <td></td>
	<td></td>
    <td>LSB</td>
    <td></td>
    <td></td>
</tr>
</table>

<p>This means we can look at the second character of a MAC address for <code class="language-plaintext highlighter-rouge">2</code>, <code class="language-plaintext highlighter-rouge">6</code>, <code class="language-plaintext highlighter-rouge">a</code>, or <code class="language-plaintext highlighter-rouge">e</code> to determine if it is a randomized MAC:</p>

<ul>
  <li><code class="language-plaintext highlighter-rouge">x2:xx:xx:xx:xx:xx</code></li>
  <li><code class="language-plaintext highlighter-rouge">x6:xx:xx:xx:xx:xx</code></li>
  <li><code class="language-plaintext highlighter-rouge">xA:xx:xx:xx:xx:xx</code></li>
  <li><code class="language-plaintext highlighter-rouge">xE:xx:xx:xx:xx:xx</code></li>
</ul>

<h2 id="detection-using-python">Detection Using Python</h2>

<h3 id="example-function">Example Function</h3>

<p>Here is an example using a Python function to test if a string representation of a MAC is a randomized MAC:</p>

<div class="language-python highlighter-rouge"><div class="highlight"><pre class="highlight"><code><span class="k">def</span> <span class="nf">is_randomized</span><span class="p">(</span><span class="n">mac</span><span class="p">:</span> <span class="nb">str</span><span class="p">)</span> <span class="o">-&gt;</span> <span class="nb">bool</span><span class="p">:</span>
    <span class="k">return</span> <span class="nb">any</span><span class="p">(</span><span class="n">local</span> <span class="o">==</span> <span class="n">mac</span><span class="p">[</span><span class="mi">1</span><span class="p">].</span><span class="n">lower</span><span class="p">()</span> <span class="k">for</span> <span class="n">local</span> <span class="ow">in</span> <span class="p">[</span><span class="s">"2"</span><span class="p">,</span> <span class="s">"6"</span><span class="p">,</span> <span class="s">"a"</span><span class="p">,</span> <span class="s">"e"</span><span class="p">])</span>
</code></pre></div></div>

<p>Example:</p>

<div class="language-python highlighter-rouge"><div class="highlight"><pre class="highlight"><code><span class="o">&gt;&gt;&gt;</span> <span class="k">def</span> <span class="nf">is_randomized</span><span class="p">(</span><span class="n">mac</span><span class="p">:</span> <span class="nb">str</span><span class="p">)</span> <span class="o">-&gt;</span> <span class="nb">bool</span><span class="p">:</span>
<span class="p">...</span>     <span class="k">return</span> <span class="nb">any</span><span class="p">(</span><span class="n">local</span> <span class="o">==</span> <span class="n">mac</span><span class="p">[</span><span class="mi">1</span><span class="p">].</span><span class="n">lower</span><span class="p">()</span> <span class="k">for</span> <span class="n">local</span> <span class="ow">in</span> <span class="p">[</span><span class="s">"2"</span><span class="p">,</span> <span class="s">"6"</span><span class="p">,</span> <span class="s">"a"</span><span class="p">,</span> <span class="s">"e"</span><span class="p">])</span>
<span class="p">...</span>
<span class="o">&gt;&gt;&gt;</span>
<span class="o">&gt;&gt;&gt;</span> <span class="n">macs</span> <span class="o">=</span> <span class="p">[</span>
<span class="p">...</span>     <span class="s">"9a:38:2b:54:f3:7b"</span><span class="p">,</span>
<span class="p">...</span>     <span class="s">"b2:fd:70:62:b0:d9"</span><span class="p">,</span>
<span class="p">...</span>     <span class="s">"16:08:61:6f:a4:97"</span><span class="p">,</span>
<span class="p">...</span>     <span class="s">"5e:b8:22:43:61:6b"</span><span class="p">,</span>
<span class="p">...</span>     <span class="s">"00:0b:86:a3:71:22"</span><span class="p">,</span>
<span class="p">...</span>     <span class="s">"fc:ec:da:16:50:fb"</span><span class="p">,</span>
<span class="p">...</span>     <span class="s">"d4:20:b0:09:1c:bf"</span><span class="p">,</span>
<span class="p">...</span>     <span class="s">"a8:8e:24:a3:38:bc"</span><span class="p">,</span>
<span class="p">...</span> <span class="p">]</span>
<span class="o">&gt;&gt;&gt;</span>
<span class="o">&gt;&gt;&gt;</span> <span class="k">for</span> <span class="n">mac</span> <span class="ow">in</span> <span class="n">macs</span><span class="p">:</span>
<span class="p">...</span>     <span class="k">print</span><span class="p">(</span><span class="sa">f</span><span class="s">"mac: </span><span class="si">{</span><span class="n">mac</span><span class="si">}</span><span class="s">, random? </span><span class="si">{</span><span class="n">is_randomized</span><span class="p">(</span><span class="n">mac</span><span class="p">)</span><span class="si">}</span><span class="s">"</span><span class="p">)</span>
<span class="p">...</span>
<span class="n">mac</span><span class="p">:</span> <span class="mi">9</span><span class="n">a</span><span class="p">:</span><span class="mi">38</span><span class="p">:</span><span class="mi">2</span><span class="n">b</span><span class="p">:</span><span class="mi">54</span><span class="p">:</span><span class="n">f3</span><span class="p">:</span><span class="mi">7</span><span class="n">b</span><span class="p">,</span> <span class="n">random</span><span class="err">?</span> <span class="bp">True</span>
<span class="n">mac</span><span class="p">:</span> <span class="n">b2</span><span class="p">:</span><span class="n">fd</span><span class="p">:</span><span class="mi">70</span><span class="p">:</span><span class="mi">62</span><span class="p">:</span><span class="n">b0</span><span class="p">:</span><span class="n">d9</span><span class="p">,</span> <span class="n">random</span><span class="err">?</span> <span class="bp">True</span>
<span class="n">mac</span><span class="p">:</span> <span class="mi">16</span><span class="p">:</span><span class="mi">08</span><span class="p">:</span><span class="mi">61</span><span class="p">:</span><span class="mi">6</span><span class="n">f</span><span class="p">:</span><span class="n">a4</span><span class="p">:</span><span class="mi">97</span><span class="p">,</span> <span class="n">random</span><span class="err">?</span> <span class="bp">True</span>
<span class="n">mac</span><span class="p">:</span> <span class="mi">5</span><span class="n">e</span><span class="p">:</span><span class="n">b8</span><span class="p">:</span><span class="mi">22</span><span class="p">:</span><span class="mi">43</span><span class="p">:</span><span class="mi">61</span><span class="p">:</span><span class="mi">6</span><span class="n">b</span><span class="p">,</span> <span class="n">random</span><span class="err">?</span> <span class="bp">True</span>
<span class="n">mac</span><span class="p">:</span> <span class="mi">00</span><span class="p">:</span><span class="mi">0</span><span class="n">b</span><span class="p">:</span><span class="mi">86</span><span class="p">:</span><span class="n">a3</span><span class="p">:</span><span class="mi">71</span><span class="p">:</span><span class="mi">22</span><span class="p">,</span> <span class="n">random</span><span class="err">?</span> <span class="bp">False</span>
<span class="n">mac</span><span class="p">:</span> <span class="n">fc</span><span class="p">:</span><span class="n">ec</span><span class="p">:</span><span class="n">da</span><span class="p">:</span><span class="mi">16</span><span class="p">:</span><span class="mi">50</span><span class="p">:</span><span class="n">fb</span><span class="p">,</span> <span class="n">random</span><span class="err">?</span> <span class="bp">False</span>
<span class="n">mac</span><span class="p">:</span> <span class="n">d4</span><span class="p">:</span><span class="mi">20</span><span class="p">:</span><span class="n">b0</span><span class="p">:</span><span class="mi">09</span><span class="p">:</span><span class="mi">1</span><span class="n">c</span><span class="p">:</span><span class="n">bf</span><span class="p">,</span> <span class="n">random</span><span class="err">?</span> <span class="bp">False</span>
<span class="n">mac</span><span class="p">:</span> <span class="n">a8</span><span class="p">:</span><span class="mi">8</span><span class="n">e</span><span class="p">:</span><span class="mi">24</span><span class="p">:</span><span class="n">a3</span><span class="p">:</span><span class="mi">38</span><span class="p">:</span><span class="n">bc</span><span class="p">,</span> <span class="n">random</span><span class="err">?</span> <span class="bp">False</span>
</code></pre></div></div>

<h3 id="example-regular-expression">Example Regular Expression</h3>

<p>Here is a Python example using a regular expression to do the same thing:</p>

<div class="language-python highlighter-rouge"><div class="highlight"><pre class="highlight"><code><span class="o">&gt;&gt;&gt;</span> <span class="n">macs</span> <span class="o">=</span> <span class="p">[</span>
<span class="p">...</span>     <span class="s">"9a:38:2b:54:f3:7b"</span><span class="p">,</span>
<span class="p">...</span>     <span class="s">"b2:fd:70:62:b0:d9"</span><span class="p">,</span>
<span class="p">...</span>     <span class="s">"16:08:61:6f:a4:97"</span><span class="p">,</span>
<span class="p">...</span>     <span class="s">"5e:b8:22:43:61:6b"</span><span class="p">,</span>
<span class="p">...</span>     <span class="s">"00:0b:86:a3:71:22"</span><span class="p">,</span>
<span class="p">...</span>     <span class="s">"fc:ec:da:16:50:fb"</span><span class="p">,</span>
<span class="p">...</span>     <span class="s">"d4:20:b0:09:1c:bf"</span><span class="p">,</span>
<span class="p">...</span>     <span class="s">"a8:8e:24:a3:38:bc"</span><span class="p">,</span>
<span class="p">...</span> <span class="p">]</span>
<span class="o">&gt;&gt;&gt;</span>
<span class="o">&gt;&gt;&gt;</span> <span class="kn">import</span> <span class="nn">re</span>
<span class="o">&gt;&gt;&gt;</span>
<span class="o">&gt;&gt;&gt;</span> <span class="k">for</span> <span class="n">mac</span> <span class="ow">in</span> <span class="n">macs</span><span class="p">:</span>
<span class="p">...</span>     <span class="n">match</span> <span class="o">=</span> <span class="n">re</span><span class="p">.</span><span class="n">search</span><span class="p">(</span><span class="s">"^.[ae26].*"</span><span class="p">,</span> <span class="n">mac</span><span class="p">.</span><span class="n">lower</span><span class="p">())</span>
<span class="p">...</span>     <span class="k">if</span> <span class="n">match</span><span class="p">:</span>
<span class="p">...</span>         <span class="k">print</span><span class="p">(</span><span class="n">mac</span><span class="p">)</span>
<span class="p">...</span>
<span class="mi">9</span><span class="n">a</span><span class="p">:</span><span class="mi">38</span><span class="p">:</span><span class="mi">2</span><span class="n">b</span><span class="p">:</span><span class="mi">54</span><span class="p">:</span><span class="n">f3</span><span class="p">:</span><span class="mi">7</span><span class="n">b</span>
<span class="n">b2</span><span class="p">:</span><span class="n">fd</span><span class="p">:</span><span class="mi">70</span><span class="p">:</span><span class="mi">62</span><span class="p">:</span><span class="n">b0</span><span class="p">:</span><span class="n">d9</span>
<span class="mi">16</span><span class="p">:</span><span class="mi">08</span><span class="p">:</span><span class="mi">61</span><span class="p">:</span><span class="mi">6</span><span class="n">f</span><span class="p">:</span><span class="n">a4</span><span class="p">:</span><span class="mi">97</span>
<span class="mi">5</span><span class="n">e</span><span class="p">:</span><span class="n">b8</span><span class="p">:</span><span class="mi">22</span><span class="p">:</span><span class="mi">43</span><span class="p">:</span><span class="mi">61</span><span class="p">:</span><span class="mi">6</span><span class="n">b</span>
</code></pre></div></div>

<h2 id="changelog">Changelog</h2>

<ul>
  <li>2020/10/03: clarifications, add link to a post by Jim Palmer</li>
</ul>

<p><strong>Thanks</strong> to Keith Miller for reading drafts of this.</p>

<p><a href="#top">↑ Top</a></p>

<hr />

<div class="footnotes" role="doc-endnotes">
  <ol>
    <li id="fn:macaddress" role="doc-endnote">
      <p>The <a href="https://en.wikipedia.org/wiki/MAC_address">Wikipedia MAC address article</a> is a good reference for more in depth reading. The IEEE tutorial on <a href="https://standards.ieee.org/content/dam/ieee-standards/standards/web/documents/tutorials/macgrp.pdf">Standard Group MAC Addresses</a> is also essential. <a href="#fnref:macaddress" class="reversefootnote" role="doc-backlink">&#8617;</a></p>
    </li>
    <li id="fn:osimodel" role="doc-endnote">
      <p>Layer 2 is known as the Data Link layer of the <a href="https://en.wikipedia.org/wiki/OSI_model">OSI Model</a>. <a href="#fnref:osimodel" class="reversefootnote" role="doc-backlink">&#8617;</a></p>
    </li>
    <li id="fn:bigendian" role="doc-endnote">
      <p>When referring to bit order in networks we use <code class="language-plaintext highlighter-rouge">network byte order</code> or <code class="language-plaintext highlighter-rouge">big-endian byte order</code>. This means the most significant bit is first. See <a href="https://en.wikipedia.org/wiki/Endianness">endianness</a> for the gory details. <a href="#fnref:bigendian" class="reversefootnote" role="doc-backlink">&#8617;</a></p>
    </li>
    <li id="fn:ouilookup" role="doc-endnote">
      <p>I use the Wireshark <a href="https://www.wireshark.org/tools/oui-lookup.html">OUI lookup tool</a>. <a href="#fnref:ouilookup" class="reversefootnote" role="doc-backlink">&#8617;</a></p>
    </li>
  </ol>
</div>]]></content><author><name>Josh Schmelzle</name></author><category term="wifi" /><summary type="html"><![CDATA[]]></summary></entry><entry><title type="html">Measuring RF Attenuation Through a Wall</title><link href="https://wizardfi.com/wifi/2020/09/24/wall-attenuation-measurement.html" rel="alternate" type="text/html" title="Measuring RF Attenuation Through a Wall" /><published>2020-09-24T01:00:00+00:00</published><updated>2020-09-24T01:00:00+00:00</updated><id>https://wizardfi.com/wifi/2020/09/24/wall-attenuation-measurement</id><content type="html" xml:base="https://wizardfi.com/wifi/2020/09/24/wall-attenuation-measurement.html"><![CDATA[<p>Attenuation is known as signal loss. The primary cause of attenuation is distance as the signal travels away from the transmitter<sup id="fnref:freespace" role="doc-noteref"><a href="#fn:freespace" class="footnote" rel="footnote">1</a></sup>. Objects like walls also cause attenuation.</p>

<p>When creating a Wi-Fi design for a walled environment, we care to know the wall attenuation values. These values are used for design input<sup id="fnref:accuracy" role="doc-noteref"><a href="#fn:accuracy" class="footnote" rel="footnote">2</a></sup>. This is because not all walls are equal. The make of walls will vary. Some may be dry wall, double dry wall, dry wall as a façade over some material, brick, concrete, or other materials.</p>

<p>Below are some of my notes on how to measure the attenuation of a wall.</p>

<p>The items needed:</p>

<ol>
  <li>A device to <strong>generate</strong> Wi-Fi.
    <ul>
      <li>Examples include your phone with a hotspot enabled, a USB powered WLAN Pi<sup id="fnref:wlanpi" role="doc-noteref"><a href="#fn:wlanpi" class="footnote" rel="footnote">3</a></sup> in hotspot mode, or an Enterprise grade AP with a battery pack.</li>
      <li>Ideally use a generating device that you can control the transmit power and channel. This is for the sake of consistency across your measurements.</li>
    </ul>
  </li>
  <li>A device to <strong>measure</strong> Wi-Fi.
    <ul>
      <li>This could be an AirCheck G2, Ekahau Sidekick, iPhone with the AirPort Utility<sup id="fnref:apple" role="doc-noteref"><a href="#fn:apple" class="footnote" rel="footnote">4</a></sup>, Android with Aruba Utilities<sup id="fnref:aruba" role="doc-noteref"><a href="#fn:aruba" class="footnote" rel="footnote">5</a></sup>.</li>
      <li>Ideally use a measuring device that you can set to scan on <strong>only</strong> the channel that your generating device is on.</li>
    </ul>
  </li>
</ol>

<p>Here is a process to follow for a particular wall:</p>

<ol>
  <li>
    <p>Place your Wi-Fi generating device at least 4 meters<sup id="fnref:4meters" role="doc-noteref"><a href="#fn:4meters" class="footnote" rel="footnote">6</a></sup> (12-15 feet for you Imperial folks) away from the wall you are measuring. There should be nothing between the device generating Wi-Fi and the wall.</p>

    <p>Example:</p>

    <p><img src="/assets/images/2020-09-24-measuring-near-side-example-min.png" alt="" /></p>
  </li>
  <li>
    <p>If you can control the scanning channel on your measuring device, set it to scan on only the channel that your generating device is using.</p>
  </li>
  <li>
    <p>Point the ‘ear’<sup id="fnref:ear" role="doc-noteref"><a href="#fn:ear" class="footnote" rel="footnote">7</a></sup> of the measuring device towards the generating device on the near side of the wall. There should be direct line of sight between both the generating and measuring devices. Do not stand between them. Stand (or sit) to the side.</p>
  </li>
  <li>
    <p>Take several sets of measurements and determine the average on the <strong>near</strong> side of the wall. You could refer to these as X. Make note of these values.</p>
  </li>
  <li>
    <p>Move the measuring device directly to the other side of the wall. Similar to the previous measurements, point the ‘ear’ of the measuring device towards the generating device. If you can, try to make sure nothing inside the wall is skewing the results.</p>

    <p>Example:</p>

    <p><img src="/assets/images/2020-09-24-measuring-far-side-example-min.png" alt="" /></p>
  </li>
  <li>
    <p>Take several sets of measurements and determine the average on the <strong>far</strong> side of the wall. You could refer to these as Y. Make note of these values.</p>
  </li>
  <li>
    <p>X - Y = Wall Attenuation</p>
  </li>
  <li>
    <p>Document!</p>
  </li>
</ol>

<p><br /></p>

<h3 id="changelog">Changelog</h3>

<ul>
  <li>2020/09/24: minor updates, added example images</li>
</ul>

<p><strong>Thanks</strong> to Mark Brasacchio and Ryan Stewart for reading drafts of this.</p>

<hr />

<div class="footnotes" role="doc-endnotes">
  <ol>
    <li id="fn:freespace" role="doc-endnote">
      <p>This is also known as <a href="https://en.wikipedia.org/wiki/Free-space_path_loss">Free Space Path Loss (FSPL)</a> <a href="#fnref:freespace" class="reversefootnote" role="doc-backlink">&#8617;</a></p>
    </li>
    <li id="fn:accuracy" role="doc-endnote">
      <p>If we use unchecked default values for walls, our design output could have unexpected real world results. <a href="#fnref:accuracy" class="reversefootnote" role="doc-backlink">&#8617;</a></p>
    </li>
    <li id="fn:wlanpi" role="doc-endnote">
      <p><a href="http://www.wlanpi.com/">http://www.wlanpi.com/</a> <a href="#fnref:wlanpi" class="reversefootnote" role="doc-backlink">&#8617;</a></p>
    </li>
    <li id="fn:apple" role="doc-endnote">
      <p><a href="https://apps.apple.com/us/app/airport-utility/id427276530">https://apps.apple.com/us/app/airport-utility/id427276530</a> <a href="#fnref:apple" class="reversefootnote" role="doc-backlink">&#8617;</a></p>
    </li>
    <li id="fn:aruba" role="doc-endnote">
      <p><a href="https://play.google.com/store/apps/details?id=com.arubanetworks.arubautilities&amp;hl=en_US">https://play.google.com/store/apps/details?id=com.arubanetworks.arubautilities&amp;hl=en_US</a> <a href="#fnref:aruba" class="reversefootnote" role="doc-backlink">&#8617;</a></p>
    </li>
    <li id="fn:4meters" role="doc-endnote">
      <p>4 meters or greater is to minimize FSPL impact on wall measurements. We want to measure the wall, not FSPL. <a href="#fnref:4meters" class="reversefootnote" role="doc-backlink">&#8617;</a></p>
    </li>
    <li id="fn:ear" role="doc-endnote">
      <p>This is where the antenna element is on your measuring device. Keep the orientation of the measurement device the same on both sides of the wall. <a href="#fnref:ear" class="reversefootnote" role="doc-backlink">&#8617;</a></p>
    </li>
  </ol>
</div>]]></content><author><name>Josh Schmelzle</name></author><category term="wifi" /><summary type="html"><![CDATA[Attenuation is known as signal loss. The primary cause of attenuation is distance as the signal travels away from the transmitter1. Objects like walls also cause attenuation. This is also known as Free Space Path Loss (FSPL) &#8617;]]></summary></entry></feed>