Installing iperf2 on Apple silicon from source
This post is about installing iperf2 from source on Mac computers with Apple silicon. The target machine used as an example is an Apple MacBook Pro 2023 with an Apple M2 Pro chip. I’ve also come back to this post in 2024 and done the same steps with an M3 MBP to install a newer version of iperf2.
Table of Contents
![]()
Choosing between iperf2 and iperf3
While iperf3 may seem like an upgrade over iperf2 based on version numbers alone, they’re different tools with different strengths.
Why does this matter?
Networking testing at gigabit and beyond speeds requires threading to fully saturate interfaces.
Without adequate threading:
- You may not fully utilize the available bandwidth
- Test results may not reflect actual performance
- Multiple CPU cores may remain untapped
iperf2 and iperf3 are both actively maintained tools. While iperf3 recently added threading support, iperf2 offers a few benefits over iperf3 for high-performance networks. For more detailed feature comparisons see the official iperf2 comparison documentation.
Here’s the rub.
Sometimes the iperf2 version provided by the system package repositories is outdated. Here is how we can compile iperf2 from source.
Dependencies
Open a terminal emulator (either the included one or something like iTerm2).
- Install Homebrew following ths instructions on their webpage.
- Install dependencies required to build and make iperf2.
brew install gcc automake
If you were on something like Debian, you’d want these depends:
sudo apt-get install build-essential g++ automake autoconf
Download source
Go to https://sourceforge.net/projects/iperf2/, click on the Files tab, and download the .tar.gz file for your desired version.
In the original post, I used 2.1.9. Here are some of the download URLs:
- 2.1.9: https://sourceforge.net/projects/iperf2/files/iperf-2.1.9.tar.gz/download
- 2.2.0: https://sourceforge.net/projects/iperf2/files/iperf-2.2.0.tar.gz/download
- 2.2.1: https://sourceforge.net/projects/iperf2/files/iperf-2.2.1.tar.gz/download
Place the zip file somewhere on your machine like ~/Downloads.
Enter that directory in your terminal.
Extract and enter the directory using tar -xvf <archive> like so:
cd ~/Downloads
tar -xvf iperf-2.2.0.tar.gz
cd iperf-2.2.0
Make
If you’ve not already entered the directory from the previous step, do so now.
- Run
./configureto configure the for our machine:
./configure
- Compile iperf2 with
make:
make
- Install iperf2
sudo make install
- Verify install:
Run which iperf and iperf -v:
which iperf
/usr/local/bin/iperf

iperf -v
iperf version 2.2.0 (10 April 2024) pthreads
Run!
On first run, you will likely need to allow iperf to accept incoming network connections when running in server mode (with -s).
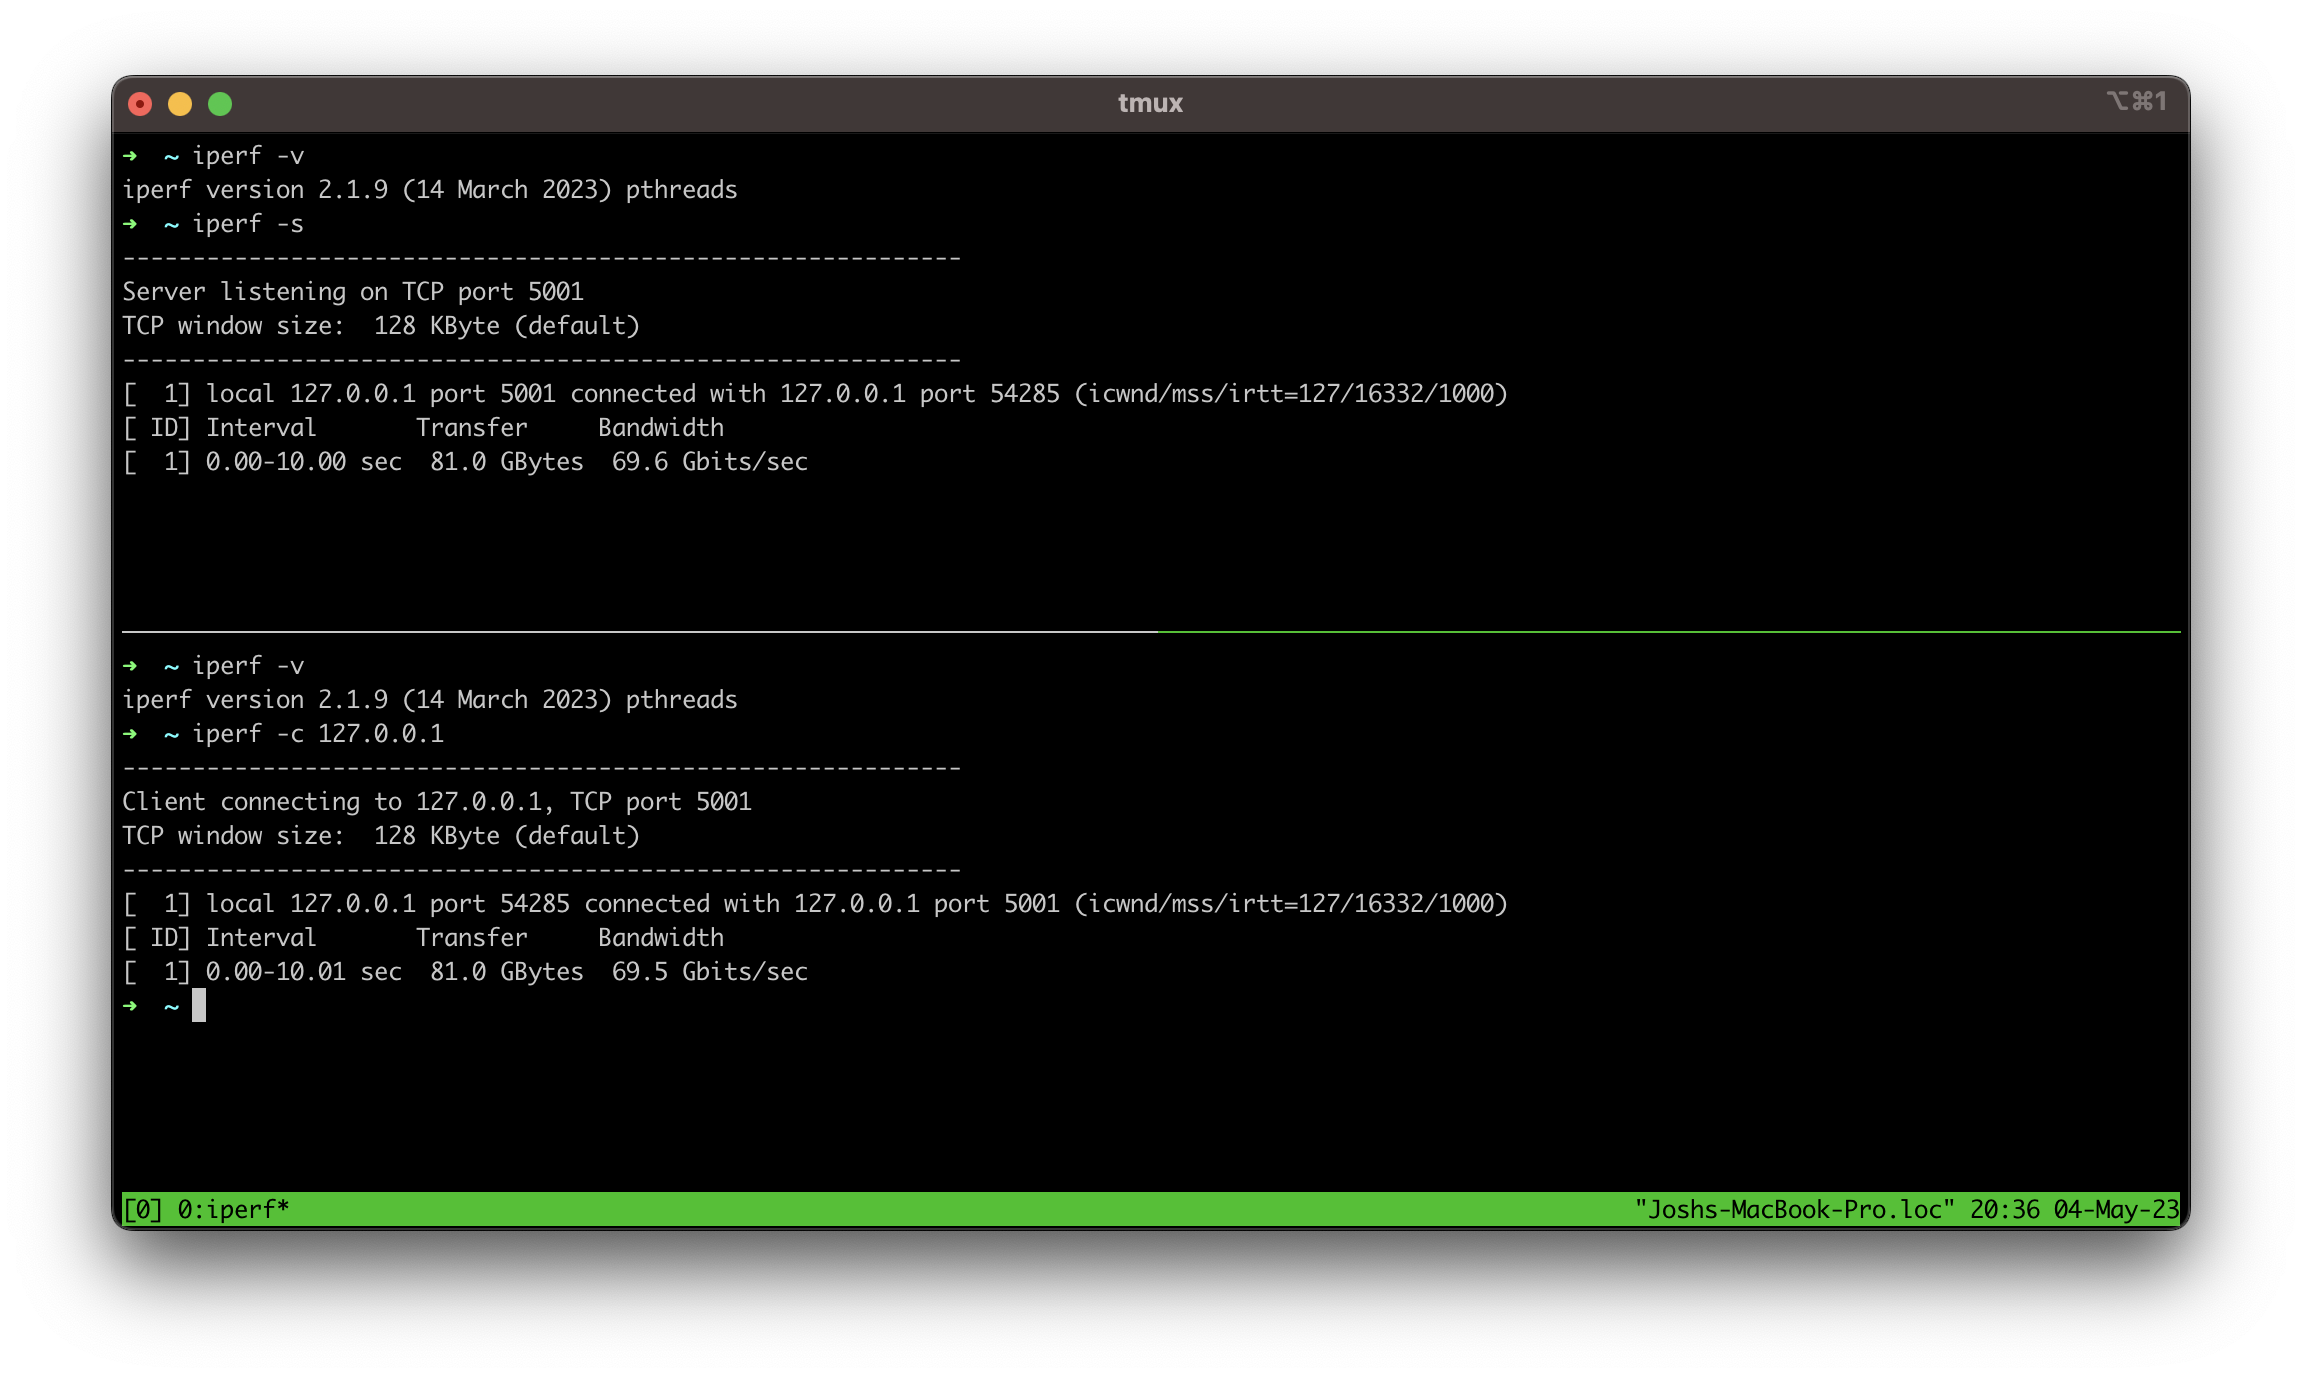
MBP M2 (iperf2 v2.1.9):
MBP M3 (iperf2 v2.2.0):
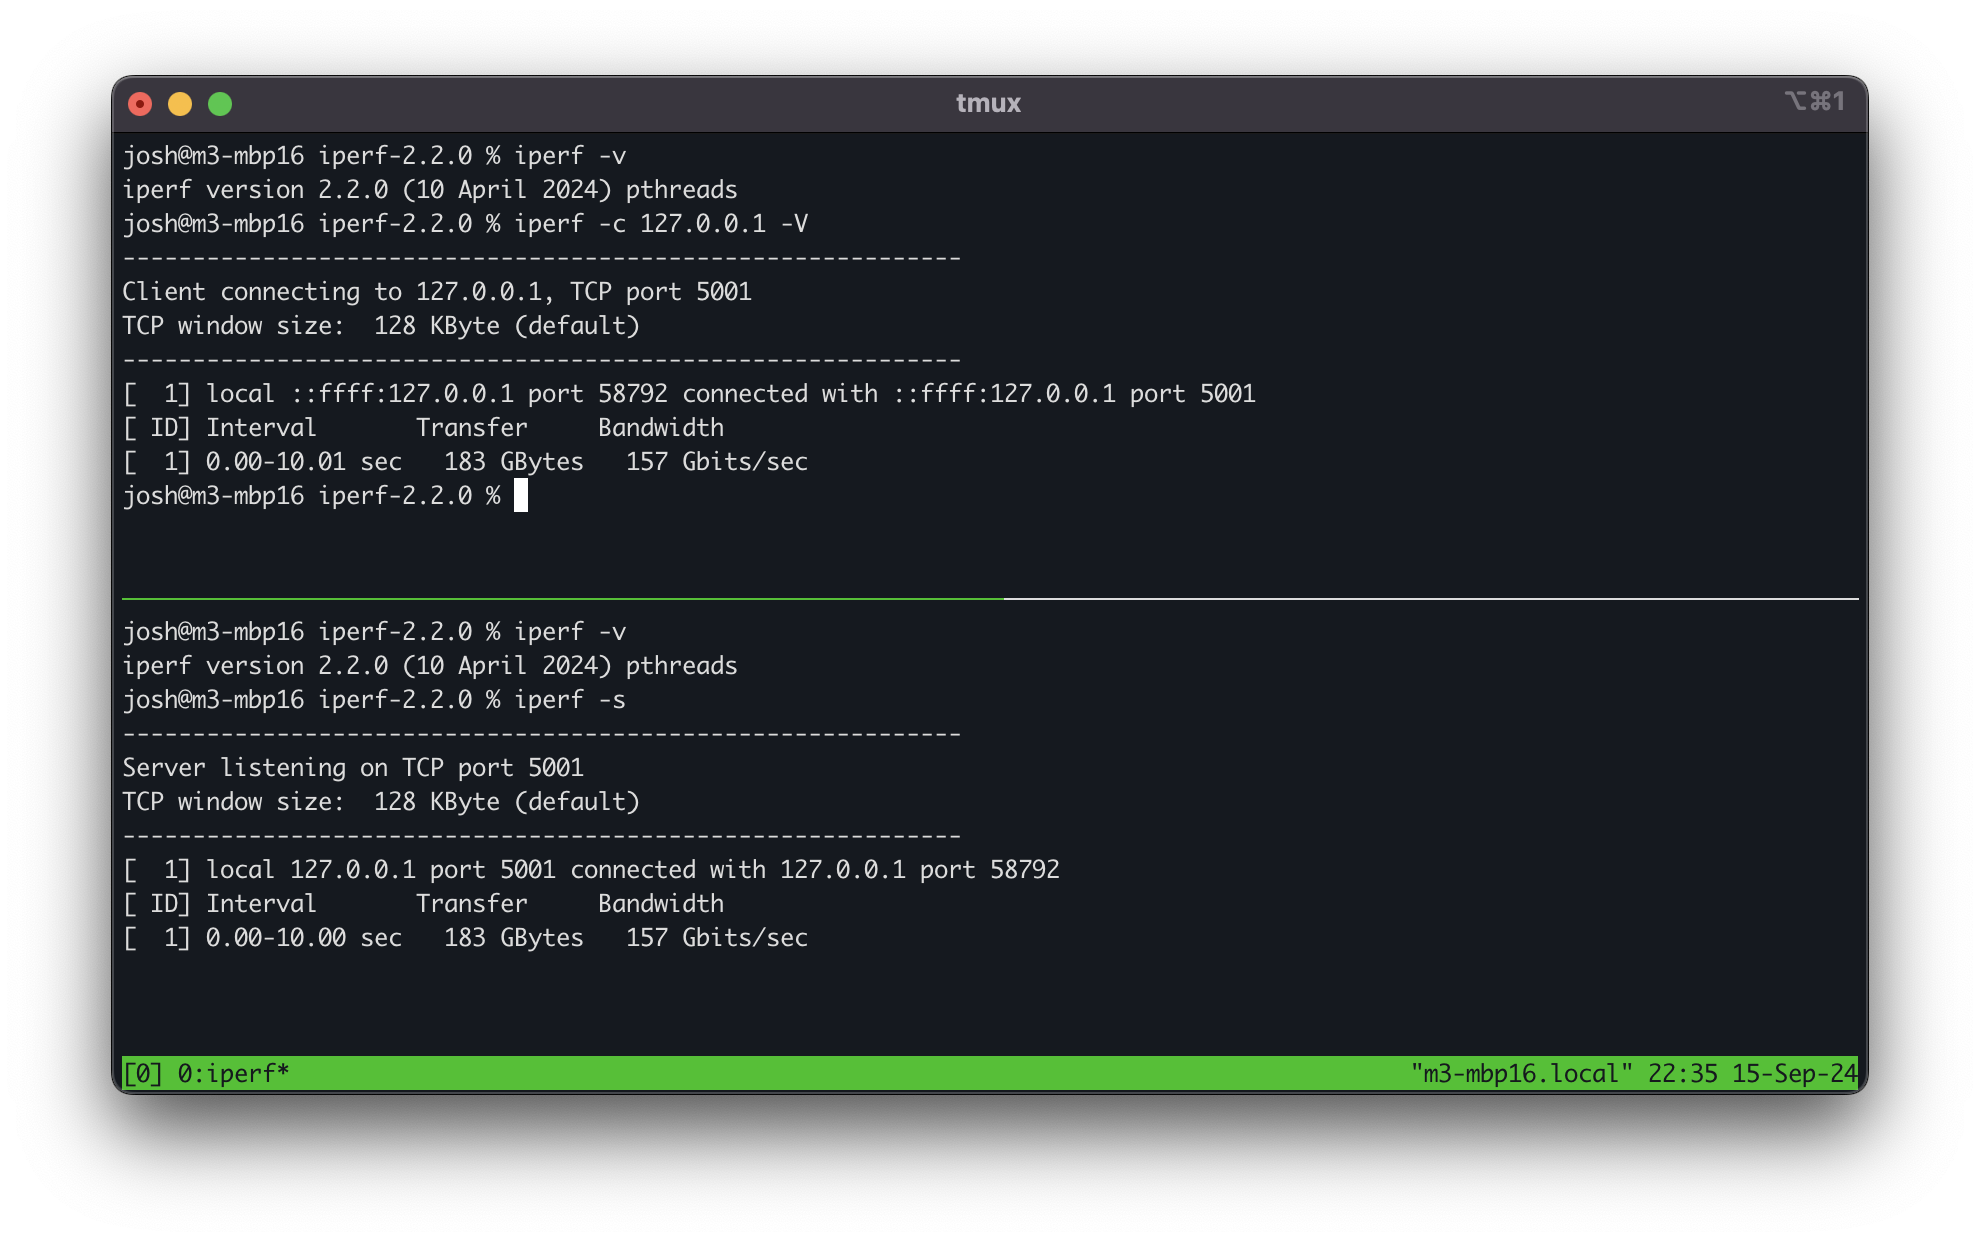
What do you think is being testing here when the server and client is on the same machine? And wow, the M3 is way faster than the M2. 125% increase!
Explore the arguments
Quick start for client mode
iperf -c <IP> -i 1 -w1M -P4 -t 60
Explanation:
-
-c <IP>: This specifies that iperf should run in client mode (-c) and connect to the server at the specified IP address. -
-i 1: This sets the interval (-i) for reporting the results. In this case, iperf will display intermediate results every (1) second. -
-w1M: This sets the TCP window size (-w) for the test. Here,1M(1 megabyte) specifies the size of the TCP window. The window size controls how much data can be sent before receiving an acknowledgment. -
-P4: This specifies the number of parallel (-P) client streams. With-P4, iperf will use 4 parallel streams to test the network. This can help in assessing the network performance under concurrent loads and can provide a more accurate measure of the overall bandwidth. -
-t 60: This sets the time (-t) duration of the test. Here,60specifies that the test will run for 60 seconds.
So, the command above will run an iperf client that connects to the server at the given IP address, using 4 parallel streams, with a 1 second reporting interval, a TCP window size of 1 megabyte, and a test duration of 60 seconds.
Usage examples
Basic Parameters
-
-s: Run in server mode. -
-c <host>: Run in client mode and connect to. -
-p <port>: Specify the port number to use (default is 5001).
Test Duration and Interval
-
-t <time>: Specify the time in seconds to run the test (default is 10 seconds). - -
i <interval>: Set the interval for reporting results (default is 1 second).
Bandwidth and Transfer Control
-
-b <bandwidth>: Set the bandwidth to use for the test. You can use suffixes like K, M, G (e.g.,-b 100Mfor 100 Mbps). -
-n <bytes>: Specify the amount of data to transfer (e.g.,-n 100Mfor 100 MB or-n 1000Gfor 1 TB).
Data Transfer Modes
-
-u: Use UDP instead of TCP. -
-l <length>: Set the length of the buffer to use for each packet (default is 8 KB). -
-f <format>: Set the format for reporting bandwidth (k for kilobits/sec, m for megabits/sec, g for gigabits/sec).
Additional Options
-
-V: Enable verbose output. -
-R: Reverse the direction of the test, so the server sends data and the client receives. -
-S <tos>: Set the Type of Service (TOS) or Differentiated Services Code Point (DSCP) for the UDP packets.
Client Options
-
-w <window>: Set the TCP window size. -
-Z <TCP compression algorithm>: Set the default congestion control algorithm (I tried reno, cubic, and bbr on the M3 and they all performed the same in the localhost test).
For a complete list, take a look at the iperf2 manpage.